
Here is a quick diagram I mocked up to detail exactly how video routing works in the studio.

Here is a quick diagram I mocked up to detail exactly how video routing works in the studio.
If you’re currently in high school in the UK and want to be a GOOD and EMPLOYED software engineer.. this is my advice.
My music acquisition process for DJ music:
Every year towards the end of the year, I put together a retrospective of events that have happened over the year – the good, bad and the ugly.


I’ve been having online guitar lessons with my friend Jon.
After a while we have got things down to a setup that seems to work remotely.
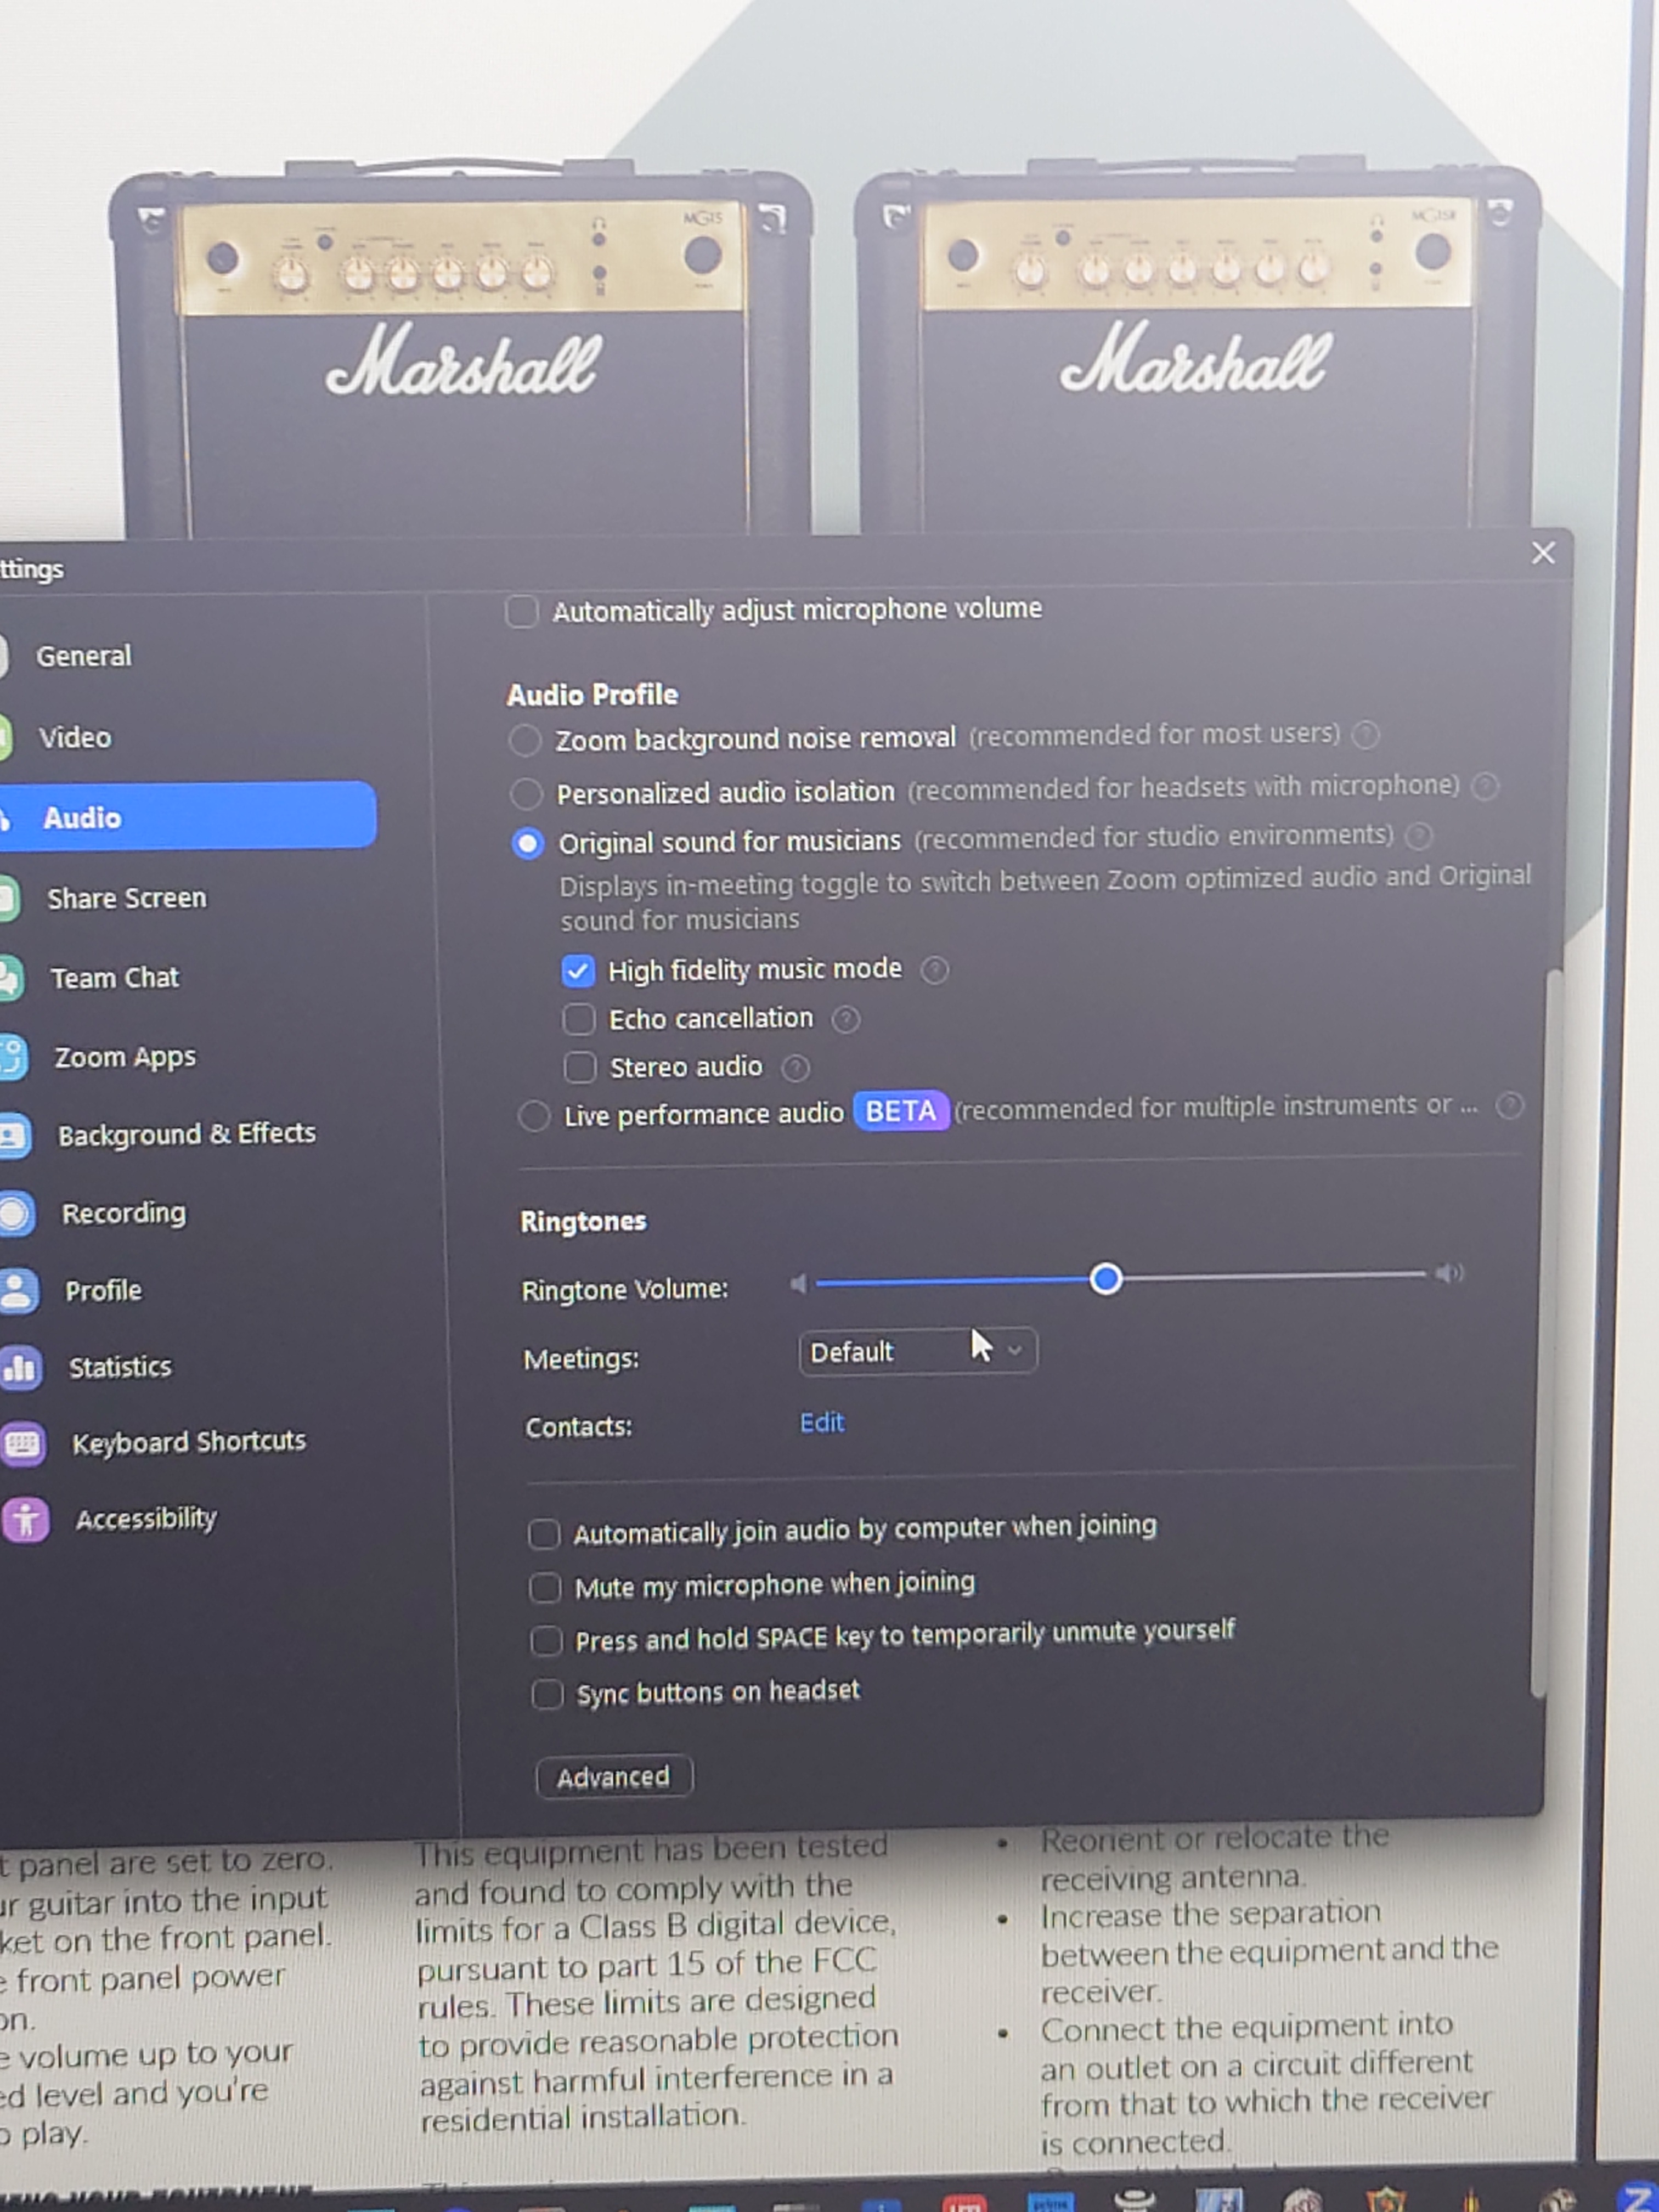
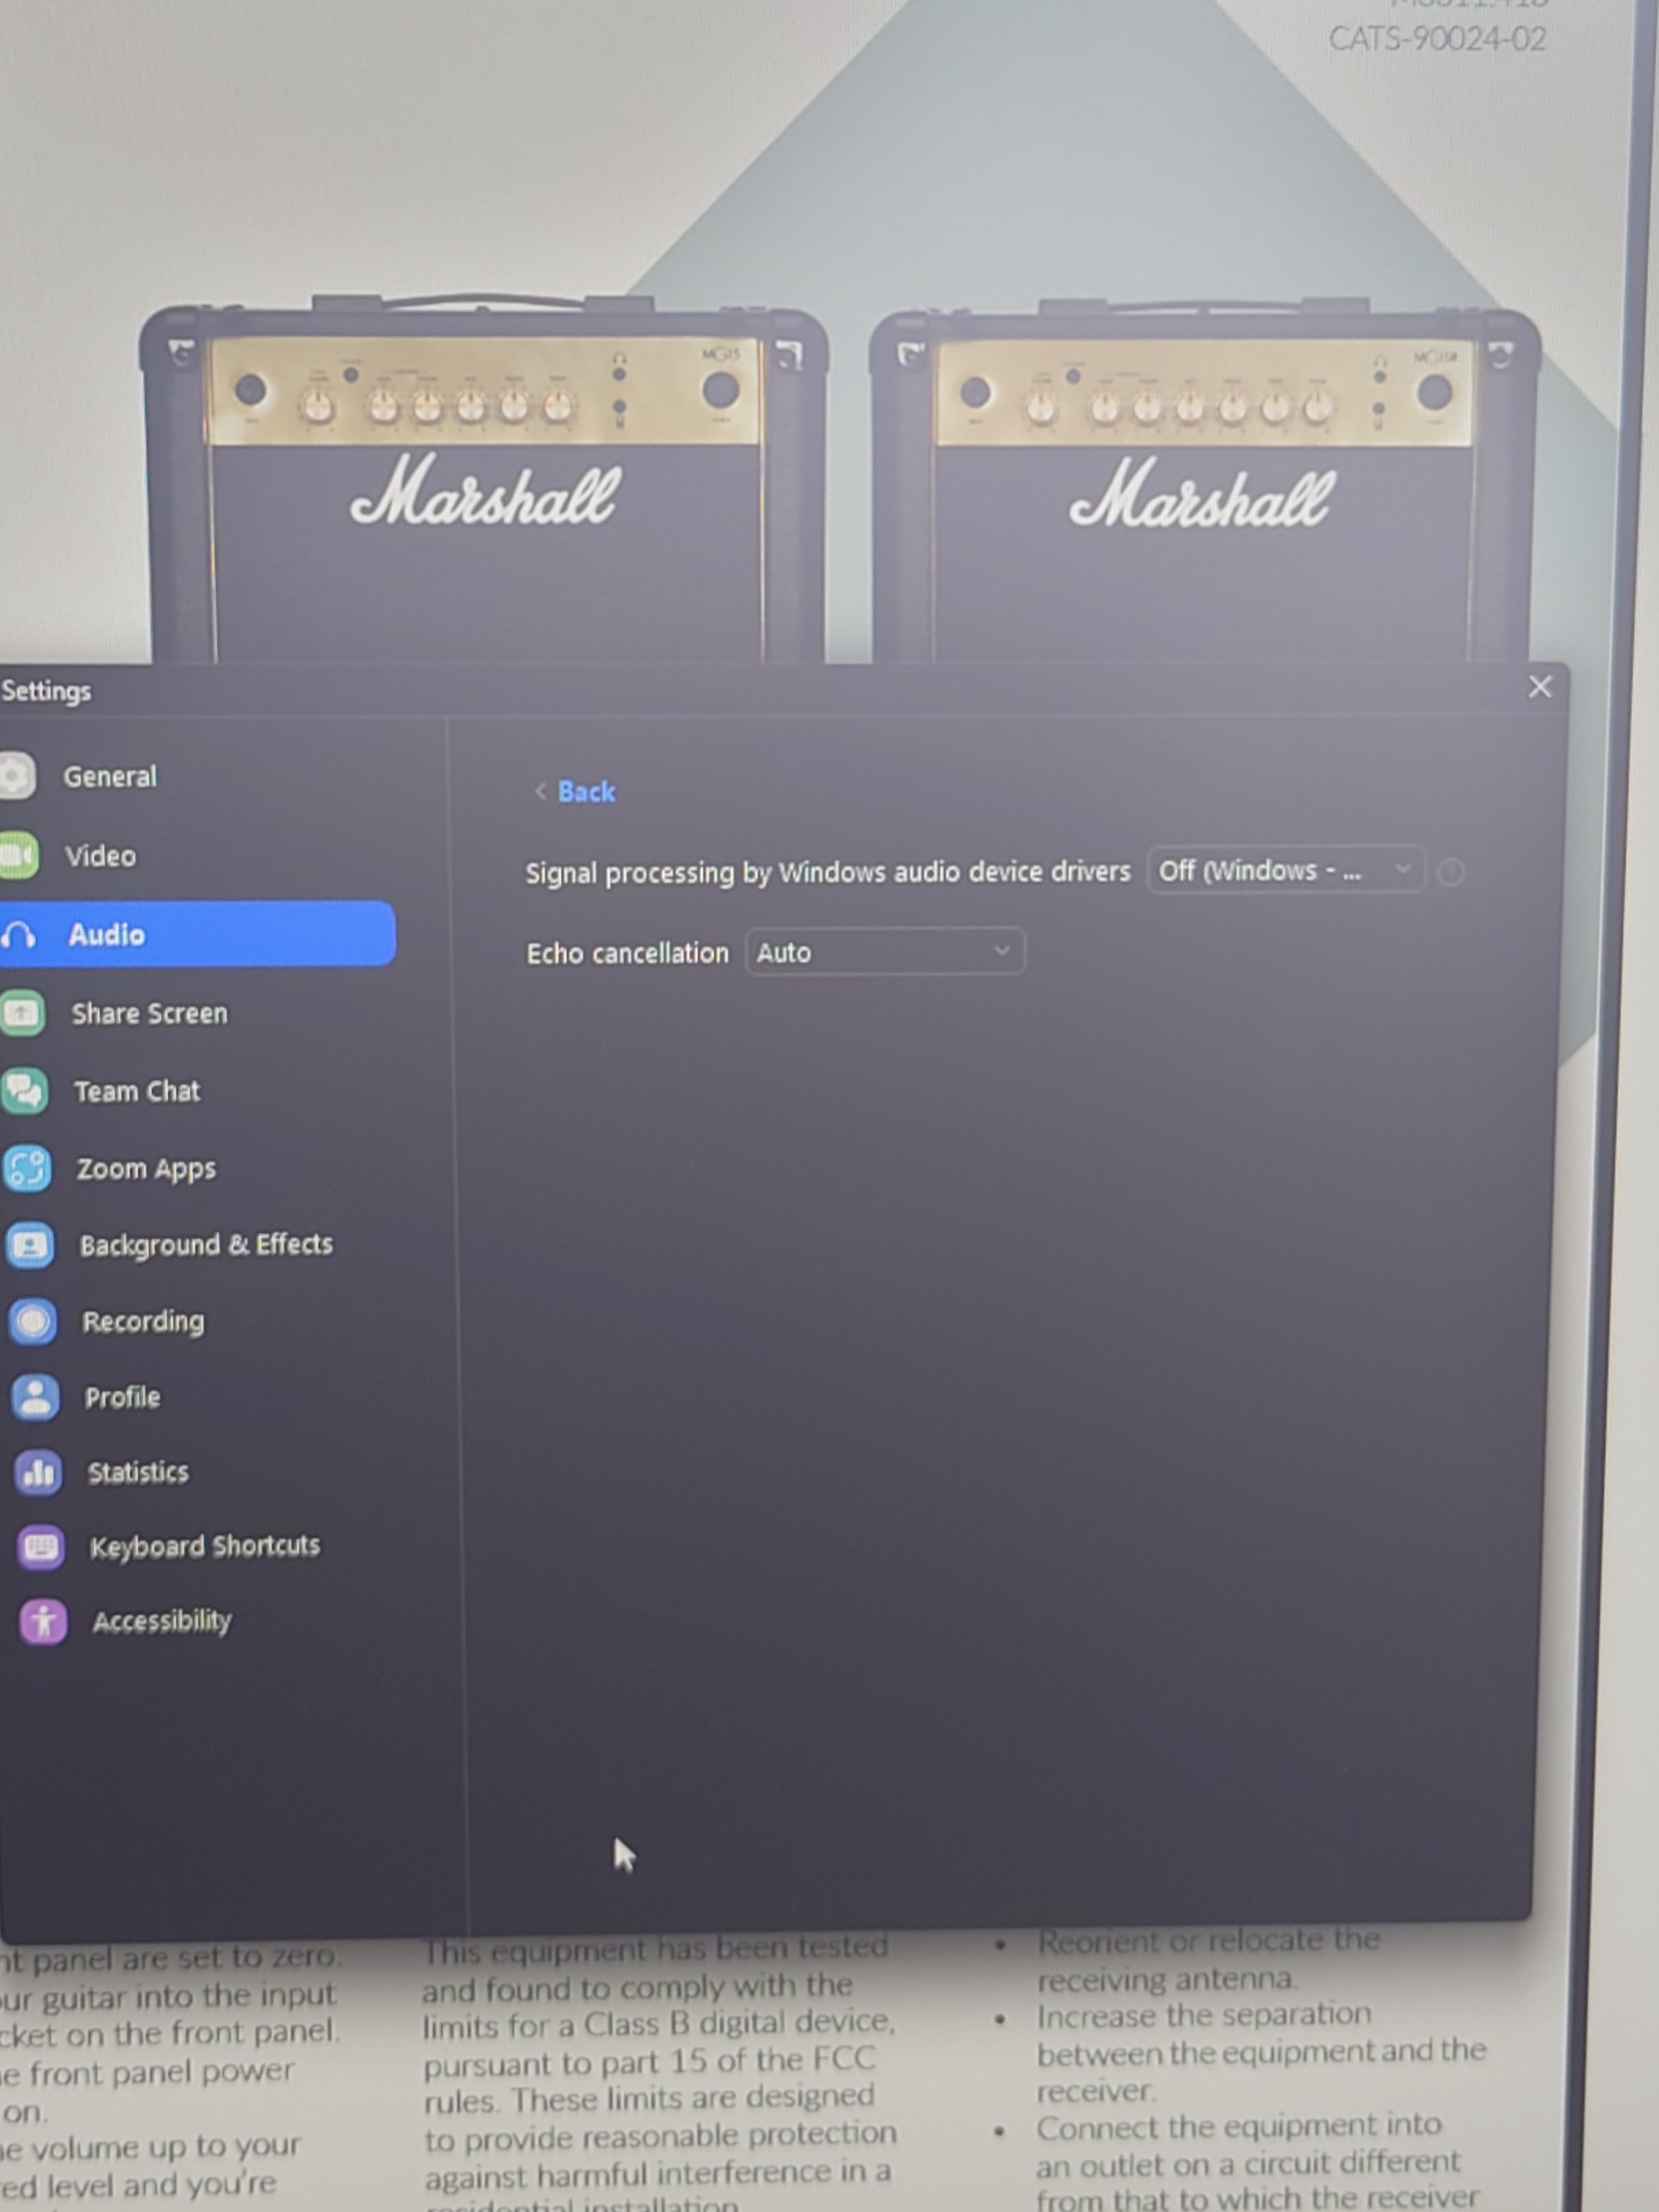
This is the Zoom configuration options that I use. Currently I do not turn on the ‘original audio for musicians’ toggle when on the call:


These are the settings I use on my guitar interface and the Marshall amp for optimium sound.
The left channel (purple cable) is the microphone, and right is the guitar amp.
Both volumes are set to max.
Pad and instrument (phono) are both ON on the microphone channel, and both OFF on the guitar amp channel.
I also have ‘Stereo audio’ setup on the sound interface, and ‘Mono Audio’ setup on the windows sound settings, so it combines both channels into one.


On the guitar, the switch is set to ‘treble’, the volume set to 10, and the distortion set to 0.
This is a small face-on camera that sits on the top of my monitor for showing my face on the call. It is a Logitech C270 camera and does not have a wide range of view.
It can be plugged into my USB hub with no problem usually.
It should be centered and the monitor lowered so that my face is in full view.


This is a wide angle logitech C920 that I use for showing the fingering and technique when I am playing guitar. I have it on a lighting boom which I also use for my DJ streaming setup so it is quite easy to move around.
It should be plugged directly into the laptop I’m using for the call as the USB hub and USB KVM does not have enough additional bandwidth to handle it. I have a USB 3 extension cable for it.


I use my Lumie Brazil S.A.D. lamp to flood my room with white light to improve the visuals for the camera, but really any bright white light source (not yellow) would achieve this.

If you are still using optical discs, e.g. CDs or Blu-rays, in music, video or games, then you are in the minority these days. Downloads and streaming have become the norm, which means 1) A lot less discs are being produced 2) A lot less optical drives are being produced.
Because a lot less optical drives are being produced, we can imagine a time in the future when the only optical drives you can buy, are second-hand. Regardless if you can buy new optical drives currently or not, often the best value/quality ratio can be found in second-hand optical drives.
But, the problem with second-hand optical drives is that they often have been heavily used, and are dirty. This is where optical drive cleaners come in.
Also, if you have a 5.1 surround system, or a complex audio/video sound setup of any type, then you can benefit from the tests and tools included on these discs. I found, for example, that even on my 2.0 stereo setup, my system was ‘out of phase’ when using my CD cleaner, and figuring that out REALLY helped the quality of my sound setup!
So yes, they are a good thing to have, and they are quite cheap, compared to the cost of buying a brand new optical drive anyway, or a new sound system!
These are the ones I use:
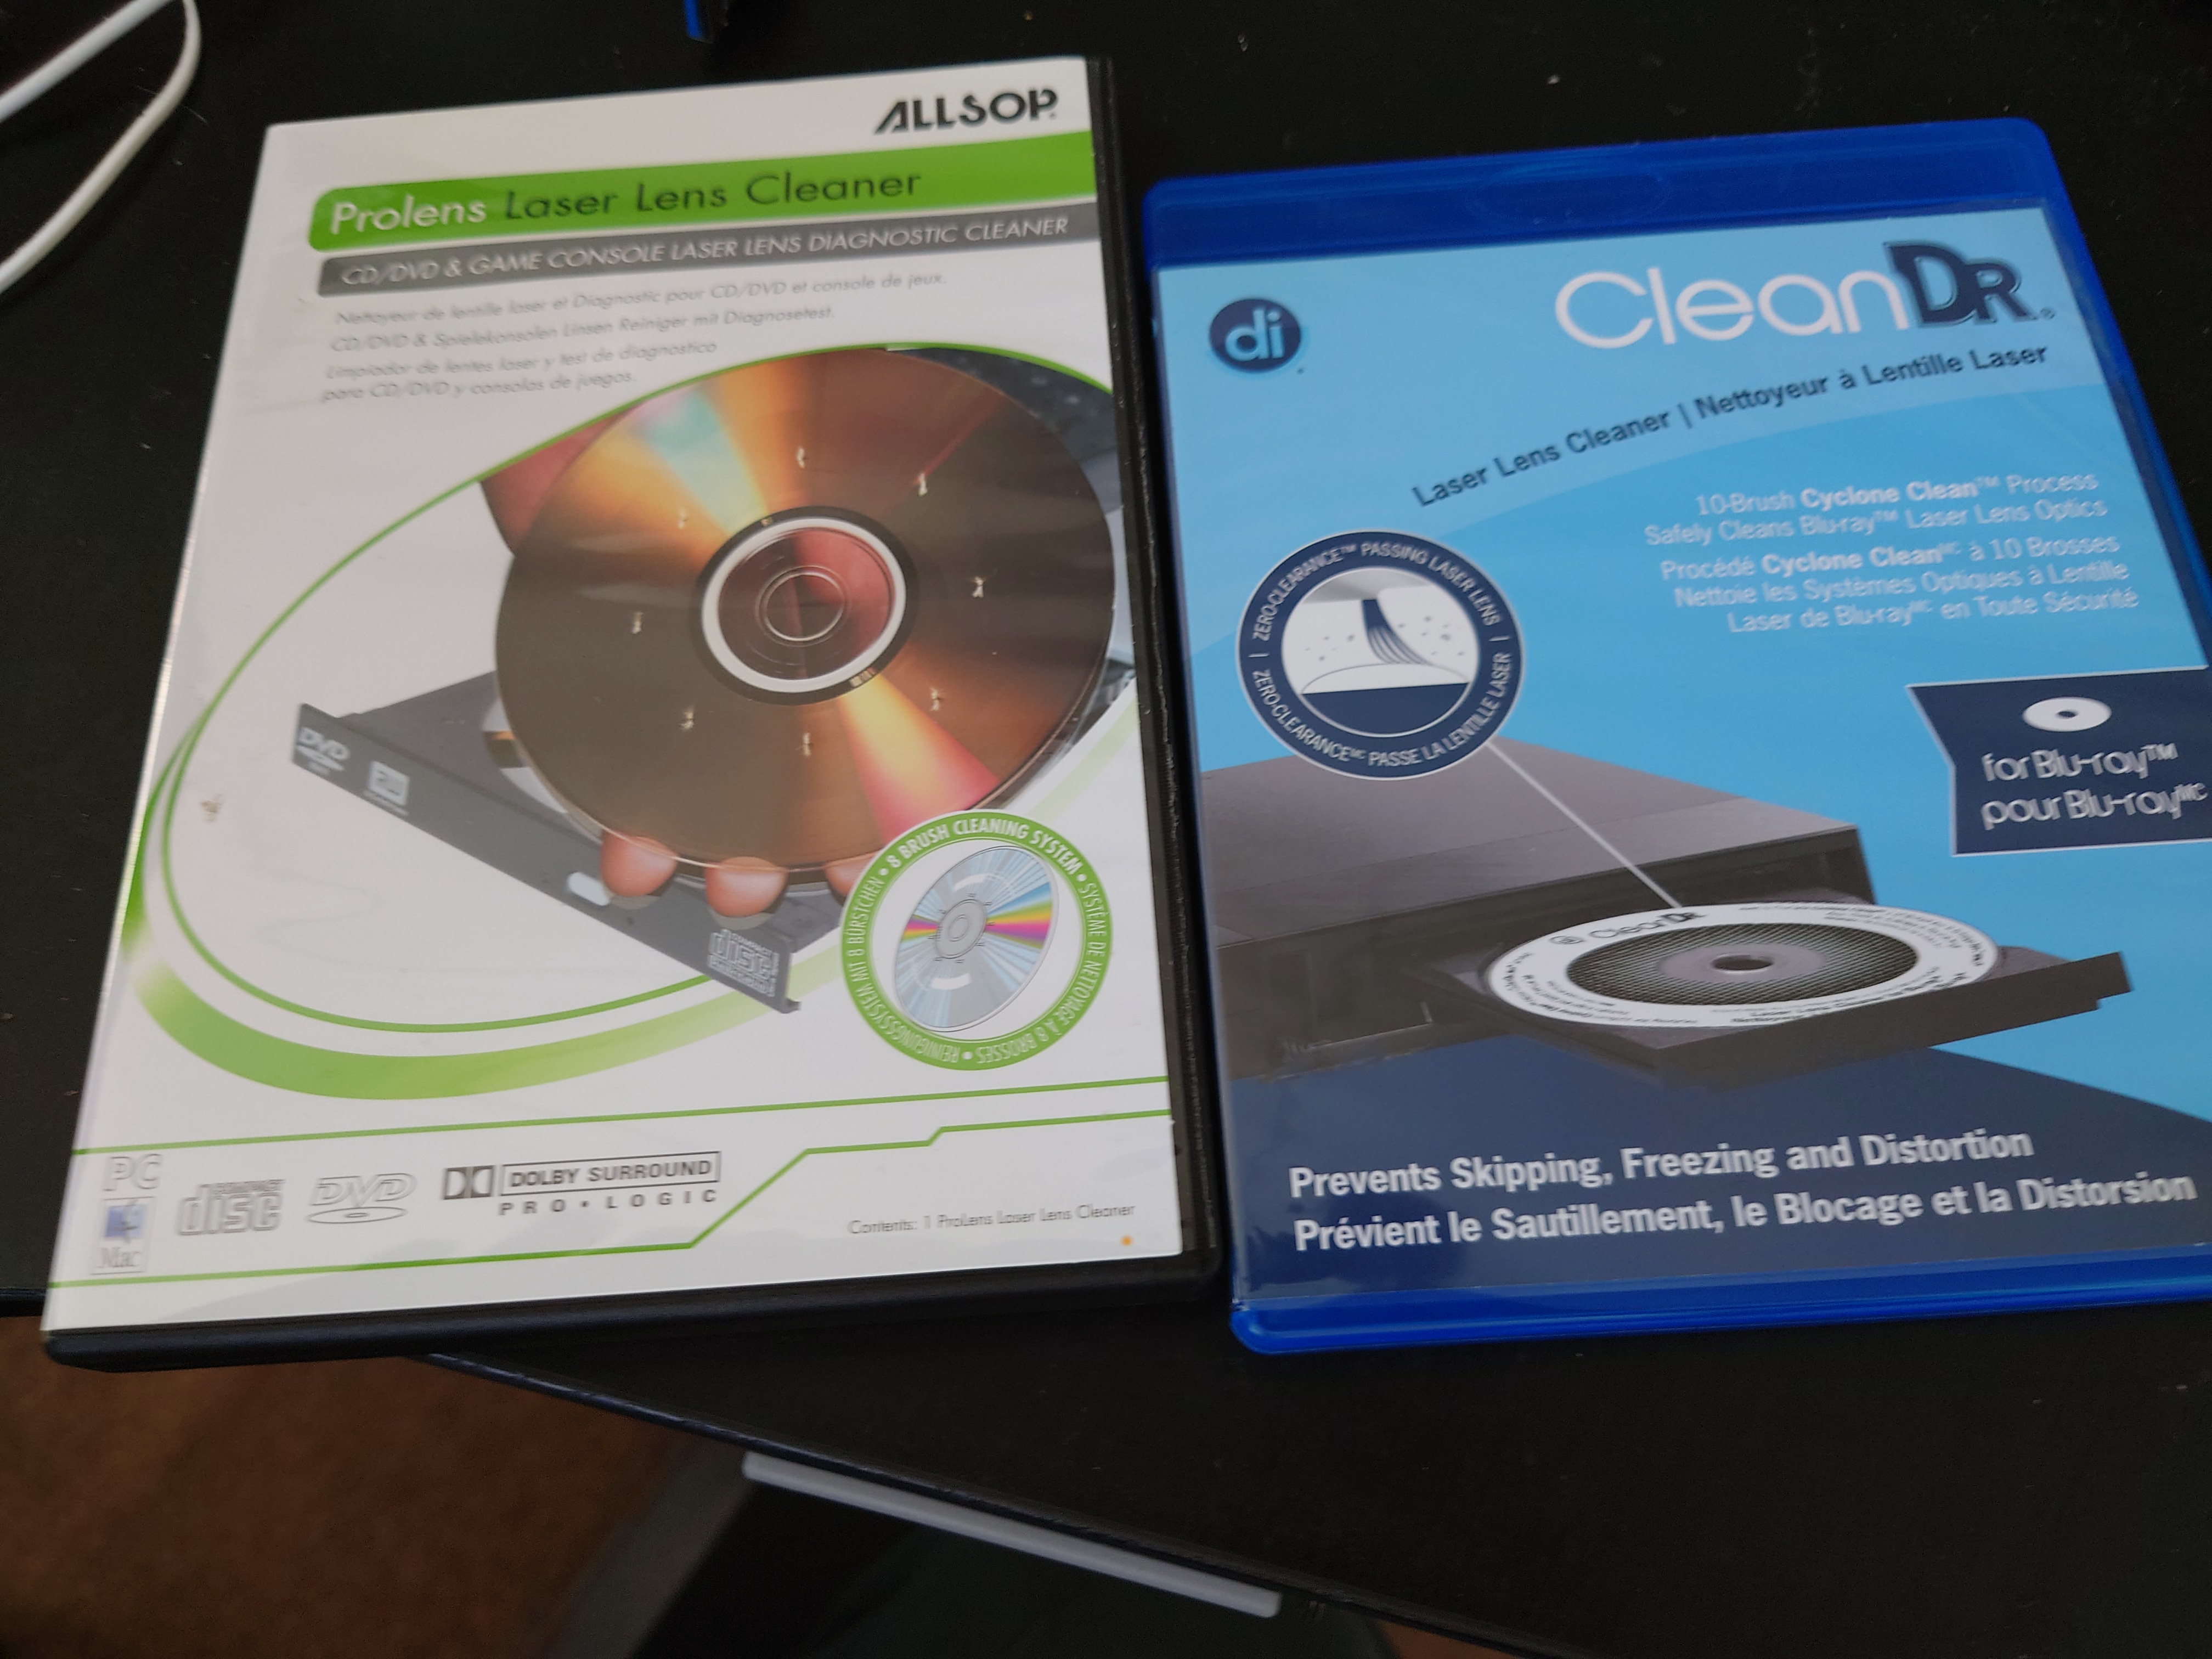
I use Allsop’s “Prolens Laser Lens Cleaner” for CD players, and DigitalInnovation’s “Clean DR Laser Lens Cleaner” for Blu-ray drives, DVD drives, and games consoles with those. They work great, and have already fixed an old CD player that wouldn’t work, and also fixed my second-hand PS4 which wouldn’t play Blu-ray games.

The Mythical Man Month and other Essays – Fred Brooks – Read it as part of my university degree. A lot of good sense. I can’t believe there are people out there in charge of software projects that haven’t read this book, or think it somehow doesn’t apply anymore, but unfortunately, it seems quite common. –
[Read reviews on Good Reads]

The Cathedral and the Bazaar – Eric S Raymound – One of the first books I read on software development process. Really blew my mind. –
[Read reviews on Good Reads]

The Pragmatic Programmer – Such an eye-opener. Such an awesome book. So many good points, even today. –
[Read reviews on Good Reads]

The Phoenix Project – A really inspiring story. Made me think that organisational positive change to a more healthy collaborative style of working is both possible and achievable. Even though I’ve never personally witnessed a change of any remotely similar magnitude happen at an organisation I’ve ever worked at –
[Read reviews on Good Reads]

Clean Code – Robert C Martin – A very important book that changed the industry, and still has a large effect today. –
[Read reviews on Good Reads]

Clean Coder – Robert C Martin – A book that made me take my profession more seriously, and try and become more of a responsible professional that deeply cares about software development, instead of just a fly-by-night money maker. –
[Read reviews on Good Reads]

The Software Craftsman: Professionalism, Pragmatism, Pride by Sandro Mancuso – key to putting exactly into words my nagging doubt around Agile project management that I couldn’t quite put my finger on before. –
[Read reviews on Good Reads]

Clean Agile – Robert C Martin – shows how very far away from the original intention of the Agile manifesto 99% of companies implementation of Agile really is, almost to a farcical level. Even though I don’t agree with some of its points, such as the emphasis on story points, I don’t have a problem with a lot of the original intentions behind the idea. Just the overwhelmingly poor examples of its implementation that I’ve experienced. –
[Read reviews on Good Reads]

Agile Testing Condensed – answers the question so many people were asking me when I worked in QA engineering, namely, “in a continuous integration world, where do test specialists fit in?”. Well, suffice to say, they never bothered to read this book.
[Read reviews on Good Reads]

A Philosophy of Software Design – key to putting my finger on and voicing some of the concerns I had over the years in organisations that were implementing Clean Code concepts well, but still were very lacking in their code and engineering quality. Also the most well-written technical book I’ve ever read. –
[Read reviews on Good Reads]

Every year (when I remember) I do an end-of-year summary to outline what has been going on in my life. I’ve been doing this for a few years now, and it’s a great way to look back on the year and see has happened.
We have spent a lot of time, effort and money on working on the house this year. Conny has put in a great deal of amazing work, in particular.
This has been transformed, from a jungle into a really nice space to relax. It is very relaxing to sit under the gazebo and get my 15-30 minutes of sun per day when I am working from home. There are always birds throughout the year around the garden, and the sound of birds tweeting away is great to listen to when you’re stressed.
We have done a lot to the Music Studio, including:
This has been completely redone.
We have a small counter-top dishwasher now, which works very well, and is very helpful in reducing the amount of housework necessary.
—
I hope everyone has a good Xmas involving a lot of mince pies, liquid refreshments, and good times.

I have been working from home, the majority of the time, for over 5 years. It took a lot of adjustment, and I’m still not 100% adjusted, but if you want to undertake this, then these are my tips.
Note that a big part of the benefit from working from home is the total flexibility in work environment, so these are only tips that work for me – they might not work for you! However, I think there is probably quite a bit of commonality.
1) Find some way of exercising.
I’m incredibly bad at this usually, but not due to lack of understanding! Lately my under-desk bike that allows me to work while cycling away, has been very beneficial. I also don’t own a car, so this increases the amount of walking I do (if I don’t get an Uber, that is).
Realistically, you probably want to adopt some kind of regular exercise routine that is out of the home, in order to get yourself out of the home and also exercising regularly. This is even more important now you work from home.
2) Have a room for your study.
I know this is difficult in a lot of situations, but really, if you are going to be working from home regularly over your career, you really need your own study area with a door that shuts. It doesn’t have to be a big room, just enough for your desk. It should of course have a window, my study has a south facing window which is great because I always get a window seat!
3) Make your own lunch.
There is still the temptation to get your own sandwiches delivered if you live in a big city like I do, but really you want to make the most of the huge savings you can make on your lunch every day, and make your own sandwiches.
4) Get enough sunlight.
I am lucky enough to have a garden, but when you are working at home and living at home, you will almost definitely spend less time in the sunshine. I make an effort to spend 15 minutes in direct sunlight every day, to help vitamin D absorption and to combat the winter blues. You probably additionally want to be taking vitamin D supplements during the winter months as the NHS recommends for everyone.
5) Make use of your freedom.
Most employers I’ve had will not care if you take a 30-minute nap during the day, as long as you don’t miss any meetings. This gives you a huge advantage over keeping fresh and alert and doing your best work over office workers. They might be tired during the day, if you’re tired, you can take a power nap. Make sure you don’t abuse this privilege, and it will help you, and your employer, as the work you do will be of higher quality.
6) Don’t use your work computer for personal things.
Not only is it unprofessional, and traceable by your employer, but you can easily keep a computing device near to you when you work from home to do all your personal stuff on.
7) Customize your desk environment.
I have a standing desk with a CD player, record player, a surround sound system, a personal computer, a fan, an ergonomic chair, and under desk bike, and a foot cushion to put my feet up when I want. I recommend NOT relying on your workplace to give you any money for your working from home environment, spend your own money, and don’t skimp, see it as a long term investment. I also recommend getting an ergonomic keyboard and mouse, and a BIG screen – mine is a 32″ graphic designers monitor. Why not make your work environment as nice as possible, now you can?
8) Have other places you occasionally work from.
I can work from my garden during the summer months, I have a sheltered gazebo, an external waterproof plug socket, and an external network cable. Have other places you can work from, even if it means a coffee shop. That will improve your productivity if you feel yourself stuck in a rut.
9) Don’t get distracted.
Remember you still have to DO the work! Actually you may have to work slightly harder in fact, because statistically remote workers are more judged on their productivity level than in the office. Things like pomodoro timers may help. I have a pomodoro timer, and also use my Amazon Echo Dot to set arbitrary quick alarms, so I can impose deadlines on myself to get things done. I also have a TODO list, that helps.
10) Make sure you have friends to talk to.
Working from home 100% can be a bit isolating, so I have friends external to work that I message during the day, some of whom also fully work from home. Do talk to your colleagues as well of course, but also have people you can call or message from time to time, just as you would have the odd quick chat in an office to your friends.
Also remember that pets are a lot more of a viable commitment now you work from home. Dogs can be very useful in particular, as they combine getting out of the house with companionship.
—
I hope these tips have helped you. I really couldn’t go back to working in an office. Working from home full time is one of the best things that has happened to my career.

This is based off of the 2021 Reddit post here: https://www.reddit.com/r/PSP/comments/kcx4ei/tutorial_convert_most_video_formats_to/
I am using it with Handbrake 1.5.1. You can import it into your Handbrake via “Preset -> File Import”.

For years, UK politics has become more right-wing, popularist, and presidential.
Right-wing, because the Conservatives have been in power for over 10 years, and have had the opportunity to implement most of their ideological policies, which we see at the moment highlighted to an extreme with Liz Truss gearing up to emulate Thatcher on almost every level.
Popularist, because the Conservatives have implemented policies designed to appease the populations feelings, rather than those based on factual positive outcomes.
The biggest example is Brexit. People voted for Brexit based on a mix of nationalism, xenophobia and racism. Lots of people were tired of the increasing multicultural nature of their communities and society, and wanted to make them ‘British’ again, whatever that meant for them.
Of course, we see now that Brexit has cost the country billions and billions, and very much reduced our standing as a powerful nation in the world. The Conservatives knew this, of course, that is why so many of the Conservative politicians now trumpeting hot air about the positives of Brexit originally voted AGAINST Brexit, because they knew it was bad for the country.
Presidential, because voters increasingly vote based on the personality of the would-be Prime Minister. They forget entirely about the policies that are part of their manifesto, presumably thinking they will not be implemented due to a general cynicism about politicians keeping their promises, which has worsened around Boris Johnson’s behaviour as Prime Minster.
The problem with picking a leader based on personality, is that you are often misled about this personality by the press and media. Especially in a country with media and press which is controlled by the right-wing. They will paint whoever is the current Labour hopeful in an incredibly bad light, so much so that the public will not be able to rationally judge them on their personality. They will also paint the current Conservative leader in glowing colours, and try and brush under the carpet any problems, as much as possible.
This is not a conspiracy theory. I have seen the change at the BBC between 2011 and 2017 while I was there. Increasingly the leadership of the organisation was put under pressure to silence left-wing voices and programmes from within, and increase right-wing representation. When I left it was most definitely a Conservative-owned media giant, with an ex Conservative MP leading the organisation. Most people who regularly read the newspapers and watch TV don’t even realise they are being influenced at all.
—
What is the alternative then? Ignore the media. Pick a leader based on the policies they say they will implement. It’s simple. The leader is just a figurehead at the end of the day, it is the whole party behind them that rules the country, and that party will have a set of policies it wants implementing and will publish them.
Simply read through their two manifestos on the different party websites, do the research on the issues around those policies on a relatively neutral website such as Wikipedia, and consider which would help you personally and people you care about the most.
But people don’t do that. They just judge the leaders personalities based on what they read in click-bait articles, the newspapers and see on TV.
I would also recommend anyone consuming the news media on any level read my article on it.
Here are some extra tips if you’re just getting started out on Ubuntu.
sudo reboot # to reboot
sudo poweroff # to shut down and power off the computer
sudo nano /etc/grub/default/grub
# find the line where it says GRUB_CMDLINE_LINUX_DEFAULT and remove 'quiet splash'
# from this variable. If that leaves the variable empty make sure it is
# still set as an empty variable, e.g. GRUB_CMDLINE_LINUX_DEFAULT=""
sudo update-grub
sudo reboot
Now you will see everything that is happening when your system starts up and
shuts down, or reboots.

For 8 TB of data storage on Google Drive, plus my own Google organization, I am paying £30/month, which is a pretty good deal.
I wanted to use this space for backing up my NAS, but it was proving difficult. The program I was recommended for Linux backup, Duplicati, was not the best for this purpose. My backup runs would not complete, they would be slow, and full of syncing errors.
Until I discovered rclone.
rclone was much better than Duplicati at backing up my NAS to Google Drive.
This is the script I use to sync the NAS content to Google Drive: https://github.com/wordswords/dotfiles/blob/568a8768154de8609a01b26560373ec5ca0eab85/bin/rclone-backup.sh
It works just like rsync, but with a progress indicator. I’ve added it to my crontab and it syncs everything up weekly.
I had planned a different network toplogy for sure, but this is my current setup and it seems to work well:


I have nearly 20 years experience, so my skill-set is in high demand from all sorts of different organisations. If I were looking for a job, then these would be my priorities:

I really like my Withings Mattress-Based Sleep Tracker.
I keep unusual sleeping hours a lot of the time, as I’m undergoing treatment, and a lot of the medication I’m taking effect my sleep. Even when I’m relatively healthy, some of the medication I’m on for a long-term condition also affects my sleep.
What’s more, I enjoy a non-standard sleeping schedule. I find I get more work done in the early morning or late at night. As I work from home 100% this is not as problematic as it used to be.
It is still good to monitor your sleep though, when you are ill or like me, when you have odd sleeping hours.
Like a lot of these smart health things, it is not perfect. Sometimes it will create erroneous data, and then correct itself a few days later, such as when I was in hospital, and it registered someone sleeping in my bed 😀 My wife was quite surprised when I told her. Thankfully for both of us it corrected itself a day later.
Also it comes up with all this wake-up time and time spend in bed not sleeping, data which I don’t really trust. I don’t think it’s reliable enough. The core metric, amount of time asleep, is fairly accurate though, within a few hours. When averaged over 1-2 weeks it does give you a good general idea of how much sleep you’re getting.
Sleep is so important for recovery and feeling well. You can compare the statistics of two fortnights, one when I was being pumped full of steroids and hardly sleeping at all, and one when I was relatively medication free and relaxed:

As you can see, I was getting max about 3 hours a night.

Although the latest week is not full, it’s a much more healthy 6 hours or so on average.
I find if I am logging 2-3 hours a night sleep for more than a couple of weeks, something is seriously wrong, however I might feel at the time, and I should see a medical professional about it. It is easy to forget this when you might be energised and “doing all the things” but there is a danger that you might be manic or hyperactive and that really isn’t good long term. So this is why I recommend the sleep tracker.

I have a relatively obscure hobby – I collect digital video games. Quite a few people collect physical games, but I like the advantages of having a large library of gaming options which are just a download away.
Like a lot of collectors, I have more games than I have actually played, or probably will do in my lifetime. I mostly get them via discounted bundles such as HumbleBundle.com, so I rarely play full price for them.
I use the excellent games launcher Playnite to organize and consolidate all my games from the various proprietary launchers, such as Origin and GOG Galaxy. It also downloads a lot of metadata for each game, including gameplay video trailers, and provides a customizable interface for everything.
I’ve dipped into emulation for some games that I used to own. But I try and keep that minimal because of the legal grey area it is under. I have ripped ISOs of the console games I used to have, before I gave them away to a charity shop.
Some people worry that with digital collections the proprietary launcher company will go bust, and you will lose access to all your games. To be honest I’m not worried about this as I’m fairly sure under that situation they would provide an option to transfer to a different launcher, or allow downloads of your entire account. I also use 2-factor authentication on everything, and keep a close eye on security alerts.
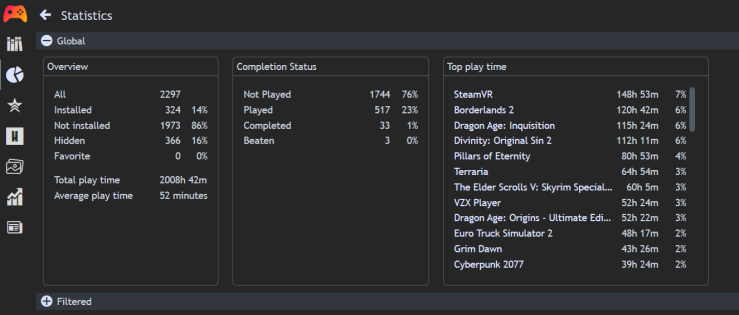
I have been collecting games on Steam since 2004 or so, so I have a large collection. It is interesting going through the various games and finding out more about them. I definitely don’t play everything, and most games for not very long, but it is a good distraction from the worries of life.
Here are my statistics from Playnite:

Now that I actually have the internet connectivity being installed to make use of it, I am getting my home network design a bit more finished.
Components:
Load-balancing internet connections:
ThinkStation Server:
Connection Speeds:
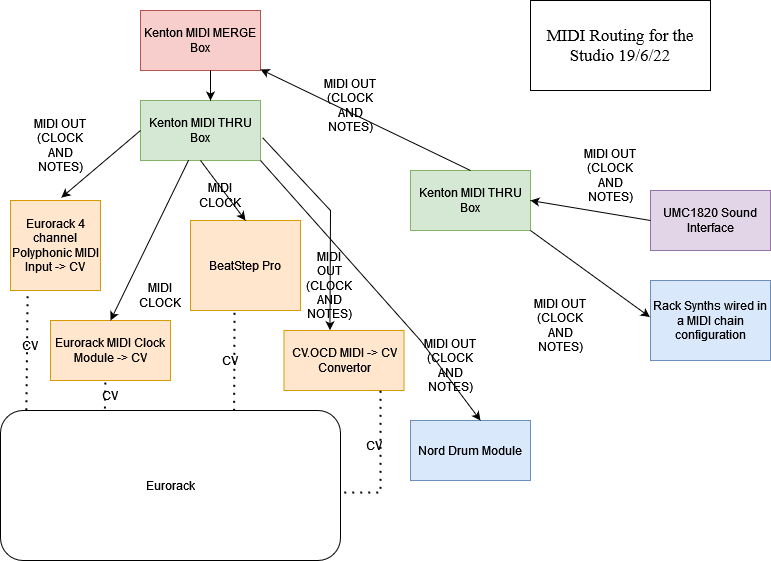
I have had this knowledge in my head for a long time now and thought it would be better to write a diagram to explain the current setup for my MIDI routing.
I use MIDI routing one way – MIDI OUT – from my UMC1820 sound interface.
I have two keyboard controllers, one next to my computer, and one next to my Eurorack, that are attached via USB to my computer which I route the notes via Ableton to the MIDI out of the UMC1820 interface.
I then selectively record the synths that I want to record. I don’t use MIDI channels, everything is making a sound at once when I press a key on the keyboard controller. I just record the hardware synths that I want to use in the track.
If I want to use multiple hardware synths in a track then I do multiple MIDI tracks and multiple records.

Did some network design for my home network. This will ensure that my new Virgin Media 1100mbps/50mps speed is fully utilised without any bottlenecks and will futureproof things up to at least 2.5Gbs/speed connections.
I should be able to load balance both internet connections to utilise them both simultaniously in the future, but for now I want to be able to get greater than 1000mbit/s speed on a single device otherwise there is not much point in speed increases past 1000mbits. Also there is a 200-300mbits speed increase possible from my existing VM hardware that is not utilised in the current network.
I will be using this method to extract the full speed from the VM hub: https://tech.msh100.uk/virgin/networking/2020/10/17/virgin-media-greater-than-gbit/
Since I have drawn up the diagram, there have been a few improvements suggested – using fibre and fibre modules instead of CAT 7 and more expensive modules to convert to CAT 7.
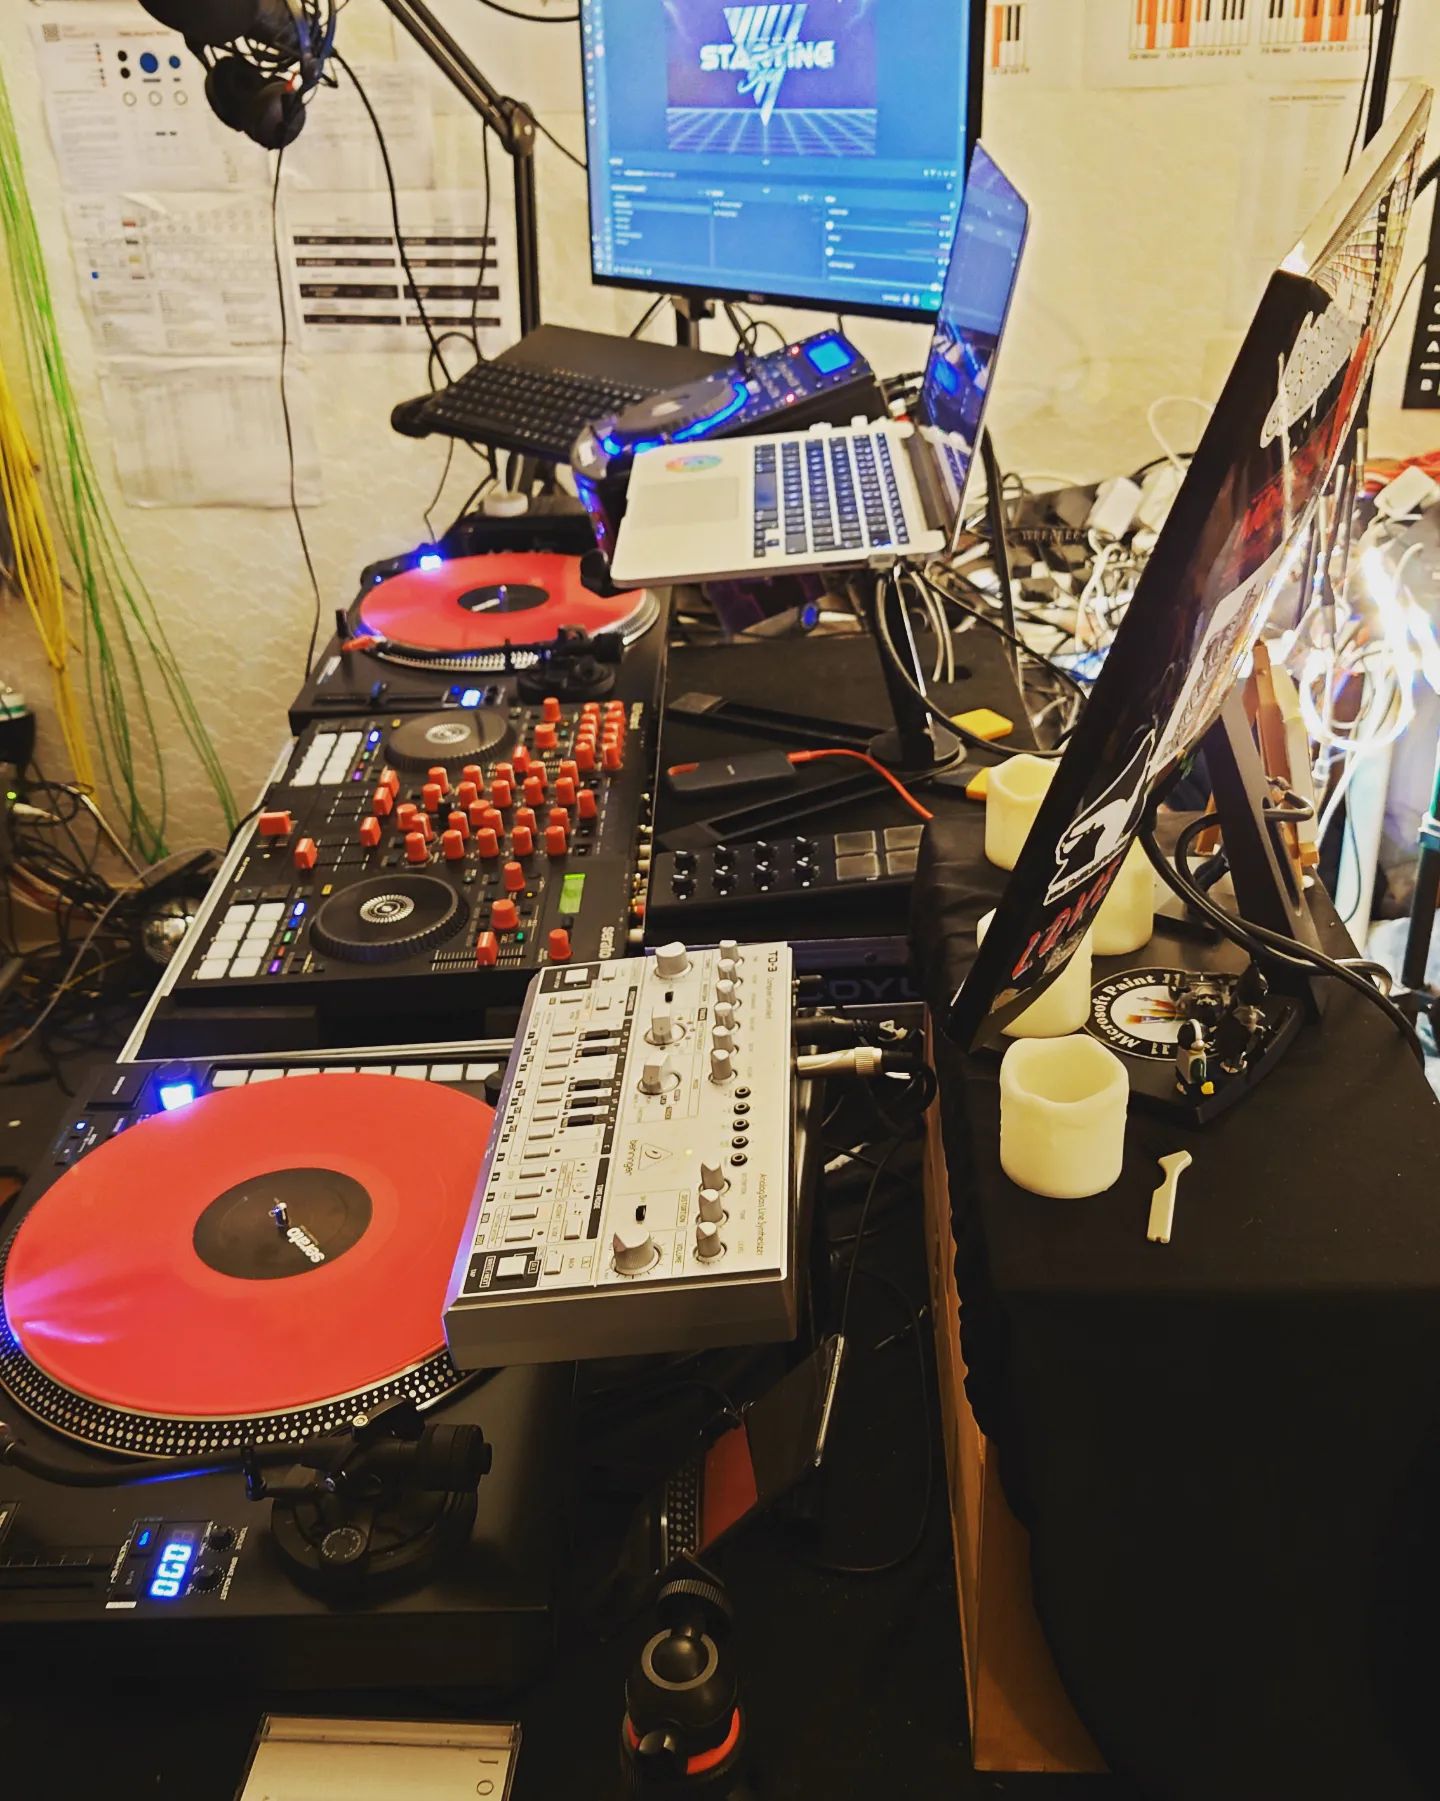
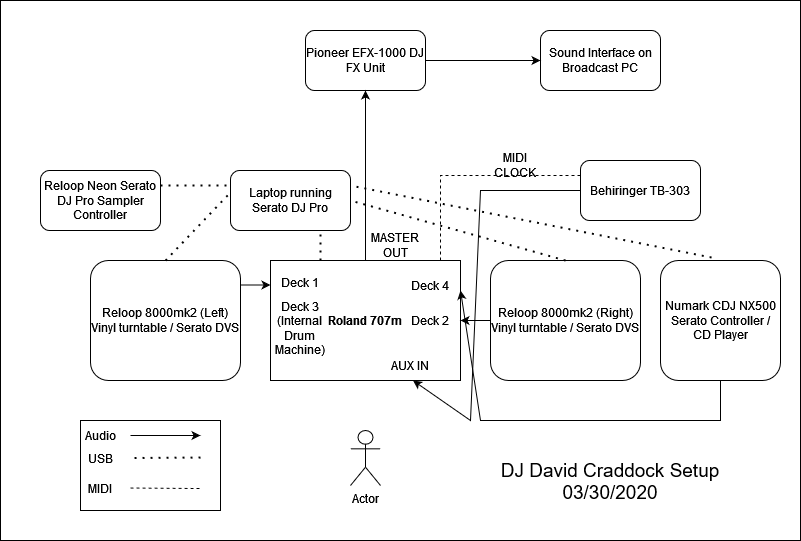
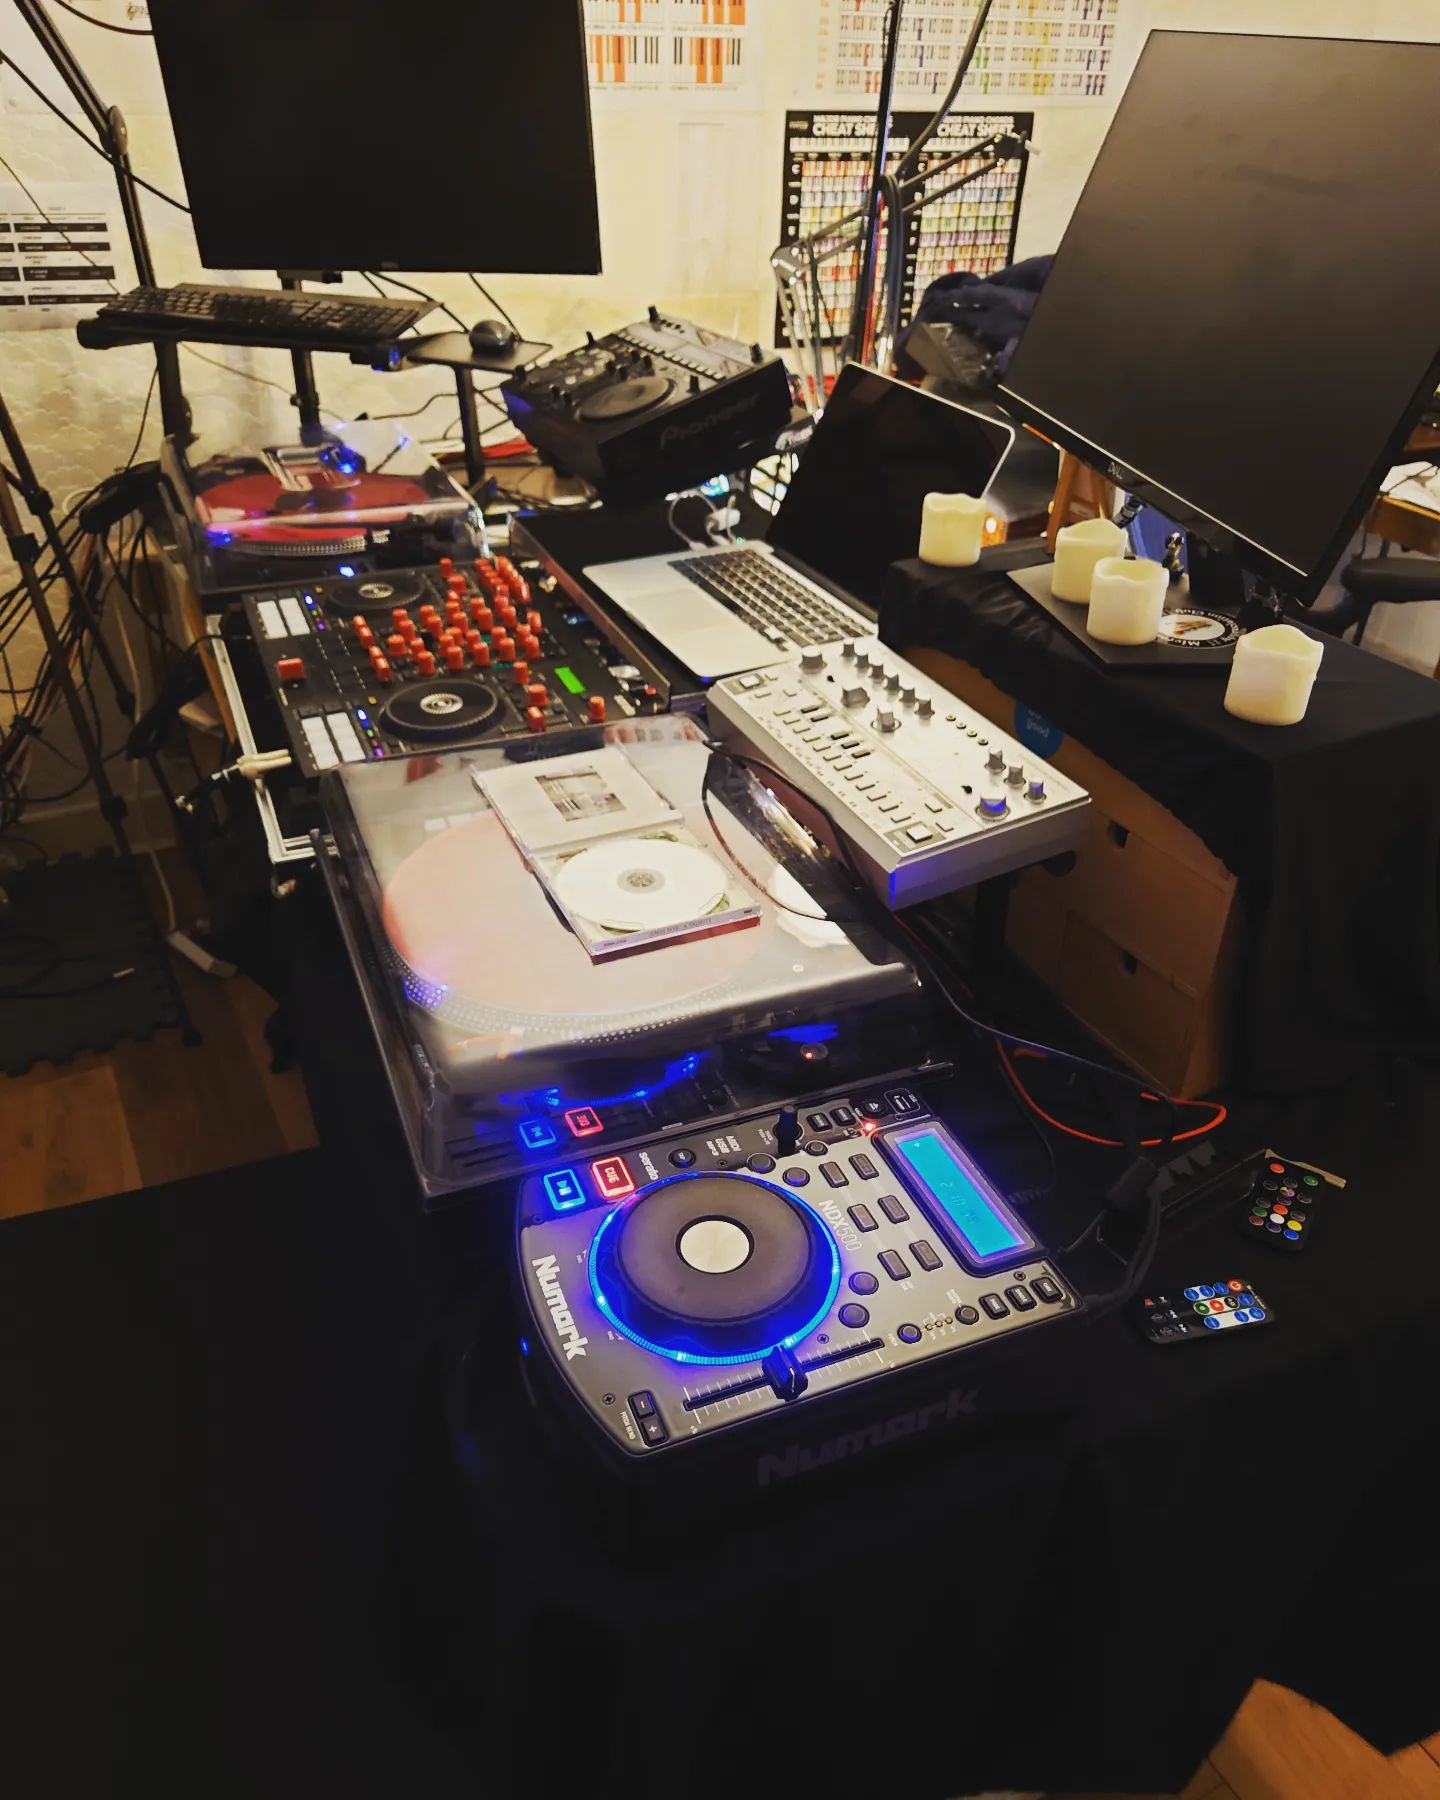
This is my current DJ setup that I use for Twitch streaming mainly.
The audio signal flow is below:

On Serato I have 4 decks mode enabled:
Deck 1 – Left Reloop 8000mk2 running in CDJ DVS mode from the preamp to line input (PC mode)
Deck 2 – Right Reloop 8000mk2 running in CDJ DVS mode from the preamp to line input (PC mode)
Deck 3 – Inbuilt Roland TR drum machine used for redrumming tracks and also providing a drum loop for use with, and outputting MIDI, to the Behringer TD-3 (TR mode)
Deck 4 – Numark NDX500 CDJ used in Serato DJ Mode (PC mode)
I have a MIDI cable running from the Roland 707m to the Behringer TD-3 so that I can sync the acid patterns according to the beat of the inbuilt Roland drum machine on Deck 3.

I use and recommend the following software for Windows. They’re all quite easy to use. The paid software all have lifetime subscriptions, which are worth it because you need the latest updates in this area.
Aiseesoft Blu-ray Player: (for playing Blu-Rays) (paid)
https://www.aiseesoft.com/blu-ray-player/
Easyfab Lossless Copy: (for ripping Blu-Rays, also works for DVDs) (paid)
https://www.easefab.com/losslesscopy/
VLC: (for playing ripped copies) (free)
https://www.videolan.org/
Handbrake: (for converting between different video formats and compressing video) (free)
https://handbrake.fr/
Plex Media Server: (for hosting video files on your network and playing them) (free)
https://www.plex.tv/media-server-downloads/
Movavi Video Editor Plus: (for editing video files, similar interface to iMovie) (paid)
https://www.movavi.com/videoeditor/
FFMPEG: (for splitting ripped video files, for TV series episodes) (free)
https://www.gyan.dev/ffmpeg/builds/
For using FFMPEG to split a ripped bluray track into episode segments, I look up the series on https://thetvdb.com which has fairly accurate epsiode runtimes, and then for example:
ffmpeg.exe -i '.\Samurai Jack Season 1_001.mp4' -acodec copy -vcodec copy -ss 01:11:43 -t 00:23:00 samurai_jack_s01e04.mp4
I then test the episode in VLC by looking at the start and end of the file to make sure the split is correct, and adjusting the start/end times and re-running as appropriate.
It may surprise some people to learn that I don’t use a word processor to write pure text any more, and haven’t for several months. I still have a subscription to Microsoft Office 365, and probably will as long as recruiters and offices around the world still pay the MS tax.
I have created my own custom writing environment in my favourite text editor, VIM. This may sound like an absolutely foolish thing to do to anyone who knows VIM. By default, it is not setup at all to be an effective word processor. It is a programmers text editor, and a very complex and difficult to learn one at that.
Over the past 12 years or so, I have been slowly customizing it to exactly my needs. The great thing about VIM is that it is highly customizable, and you can change almost every major element of it to suit your tastes.
I use the following plugins when writing text or markdown files.
This changes the wrapping mode and a number of other VIM options to make VIM suitable as a word processor instead of just a programmers code editor.
https://github.com/preservim/vim-pencil
This is a distraction free way of writing. Because of the way I have set it up, there is a lot going on in the default interface of VIM. This strips everything away to just what you see in this screenshot:

https://github.com/junegunn/goyo.vim
I toggle the ‘GOYO’ mode by pressing <F12>.
VIM’s default spellchecker. I use it in British English mode (of course). As soon as I type a misspelled word, it highlights it. Then I can use the arrow keys to skip between each misspelling and fix it with some keyboard shortcuts.
This picks up words which are not helpful. For example, I have a bad habit of using the word ‘actually’ too many times. Wordy will highlight this. It has a number of dictionaries of ‘useless’ words which it will check for. It is opinionated, but I find it does help improve the quality of my writing.
https://github.com/reedes/vim-wordy
This is a Java-based command-line open-source grammar and spell checker. It is very thorough and picks up a lot of things. I don’t know how it compares to MS Word’s checking, but I find it more useful than I remember Word’s grammar checker being.

https://github.com/dpelle/vim-LanguageTool
—
For more information on my VIM setup, check out my dotfiles repository at https://github.com/wordswords/dotfiles.
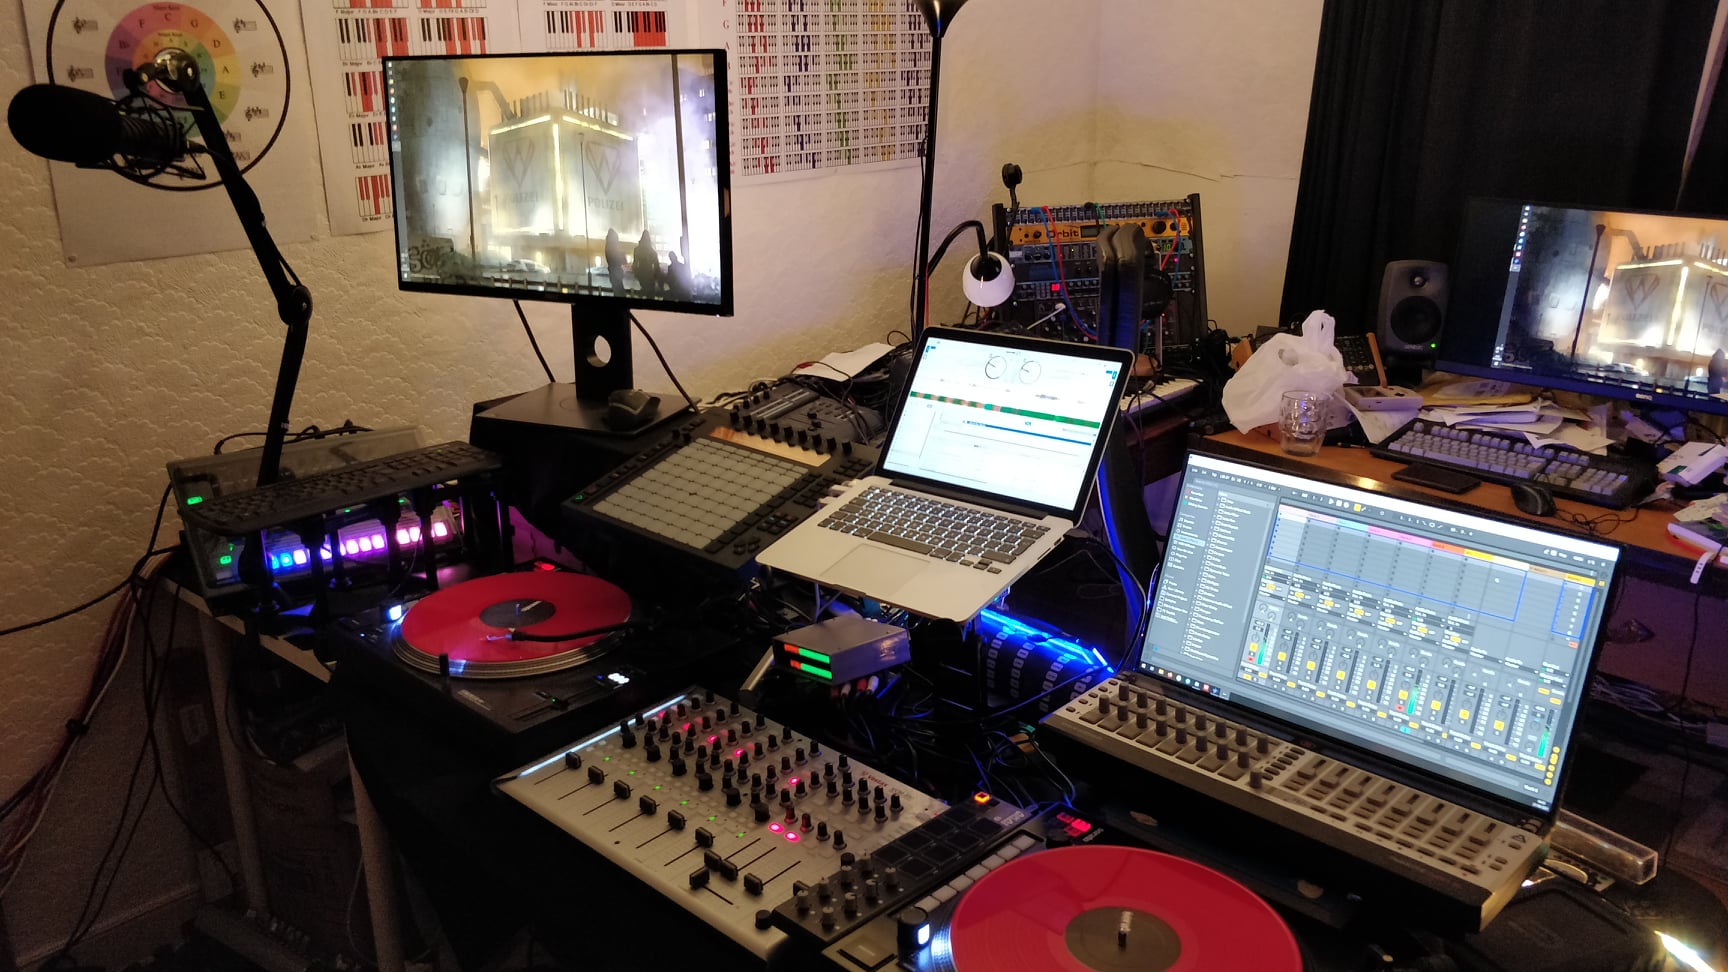
This is my current DJ setup with the following components:
I have simplified things massively over the last year over my previous setups with the purchase of the Roland 707m. It it an amazingly clever piece of equipment and does so much. I think it is definitely one of the most advanced and most powerful controllers on the market today. This is what I can do with the new setup:

Using Jenkinsfiles in repositories for declarative pipelines, which is an example as infrastructure as code, is absolutely the right thing to do, in my opinion.
However the tooling for debugging and error checking Jenkinsfiles is currently quite difficult.
First of all you need to make sure to be able to access the Jenkinsfile linter. This linter is processed on the Jenkins server itself, unusually. There is a configuration option that requires adminstrator access to the Jenkins server.
There are a number of options to access the linter, but Jenkins officially recommends the ssh server option with preshared ssh public keys as outlined here:
https://www.jenkins.io/doc/book/pipeline/development/
Once you have set it up, you can pipe Jenkinsfiles through ssh to the linter and it will lint the Jenkinsfile for you:
ssh jenkins.dev.mycompany.co.uk -p1337 declarative-linter < Jenkinsfile
(change jenkins.dev.mycompany.co.uk and the port number to match your configuration of course)
And it will output the errors in the file.
VIM won’t automatically syntax highlight Jenkinsfiles because they don’t have an extension that it recognises. This is easily fixed with the following autocommand added to your .vimrc though:
autocmd BufRead,BufNewFile Jenkinsfile set filetype=groovy
This will ensure that Jenkinsfiles have some measure of syntax highlighting when loaded, as they are valid Groovy files.
Once you have the linter running on a ssh port (see above) you can add this line to your .vimrc to have the linter run whenever a Jenkinsfile is saved, allowing you to debug your changes when you save them:
autocmd BufWritePost Jenkinsfile !ssh jenkins.dev.myompany.co.uk -p1337 declarative-linter < %
(change jenkins.dev.mycompany.co.uk and the port number to match your configuration of course)
This setup should make it significantly easier to spot and fix errors in your Jenkinsfile before it gets to the git commit stage.
I thought I’d write here a bit about how I got into technology and how my career has progressed for those people wanting to get into technology.
I was lucky enough to be born in a supportive home to good parents. My father was an early entrant into the world of computing, and my birth certificate records his profession as a ‘Computer Science Lecturer’, which was very rare at the time. In actuality, I’m fairly sure he taught only at local higher education colleges, but technically that still made him a lecturer. At any rate, he definitely worked in computing at a time when few others did (1982).
I was always interested in computers as a child. From an early age I was often seen next to the family computers, which were supplied at a regular basis from my dad’s workplace as he took home computers to get more familiar with them. I mostly used them for games. I spent a lot of time reading as a lot of people did before the internet. When I was 11 I borrowed a programming book from the library for the BBC Microcomputer and painfully typed in lines and lines of BASIC code from this book for a simple game. It didn’t work. Frustrated, I left my programming ambitions there.
When I was 11 (1993) I got my first IBM compatible PC for my ‘schoolwork’. This sat in my room at a desk. This was a huge thing for me and I spent most of my spare time next to that thing, mostly playing games.
When I was 13 or 14 I first got online. My mum had an AOL account that she was meant to use for her teaching, and I was able to use it a few hours per week. That was a huge thing for me. I became really interested in hacking and computer security. I spent about an equal time playing online games, chatting online and trying to be a hacker. It opened up a huge new world for me because we lived in a rather sleepy countryside town and had very little access to the bigger world.
My parents in vain tried to restrict me from going online. I took extraordinary measures to get online because there was so much more for me there than old library books and right-wing country viewpoints. Some of these involved staying up until late and taking the modem out of my dad’s PC at night and putting it in my computer and surfing the internet all night. Later I got my own phone line extension to my room, briefly. I was allowed a set number of hours per week online and no more. My parents were worried I would spend too much time on the internet and not enough on my studies or the ‘great outside’. They were right.
I found ways to repeatedly break their restrictions including programming my Linux PC to repeatedly redial a number infinitely to trigger the relay in the phone socket lock they had put on the master phone socket downstairs. Eventually it ran out of power, and I was able to use the internet when I liked. My dad eventually had enough and disconnected my phone line extension to my room. But by that point the school had internet, and I was able to use it at lunchtimes and in my free time.
I was 16 (1998) and I started Computing A-level classes which involved a lot of practical programming. With my head start in computing I found learning to program easy and fun. I hadn’t really excelled in much else at the grammar school I was in so that was a big deal for me. We used Visual Basic 5 and I spent a huge amount of time programming, getting into trouble for hacking the school IT network, and learning about programming.
I ended up repeating the second year of sixth form because of health reasons, so I actually had three years of Computing A-Level. I spent the third year mostly working on a programming project that my dad had arranged with his IT support technician team he managed at the local college he worked in. The project was building a hardware stock management database in MS Access and Visual Basic. It was quite a huge project and I spent a lot of time on it, and also got hired for a month as a summer job continuing to work on it after I had finished it.
I got fairly good A-Level grades for the time and got a place at Sussex University studying Artificial Intelligence with North American Studies. I only took the NA minor because it promised a year in America. Soon however I found I wasn’t very good at North American studies, and the tutors took a dim view on my use of Chomsky in my papers around 9/11 and the far left American viewpoints I was into. So I changed my degree to Computer Science with Artificial Intelligence after the first year.
University was a time of great social adjustment and life experiences for me, and I had some quite serious mental health problems at university. This caused me to take a year out. I spent that year mostly geeking out and expanding my computing knowledge. A succession of summer jobs followed including some web development, QA testing for computer games, and finally working for a web start-up as a PHP developer.
I struggled at university mainly because I didn’t have the maths background for my degree. The courses assumed knowledge of A-Level maths, but I had never taken A-Level maths, and it was never asked for. So I found it very difficult studying advanced neural network algorithms, for example. Most of the degree though I found very interesting, and I got a lot out from it. My dissertation was another software project arranged with a local company, and I got a 2:1 for it, although the company was not interested in hiring me after I graduated.
It was 2005 when I graduated, and got a job at £13,500 per year as a junior developer working on MS Access/Visual Basic database front ends for a telemarketing company. The development team were impressed with my degree as none of them had degrees. I really didn’t like working there though, and only stuck it out for 6 months before moving on.
I worked a number of short term IT and software jobs, only sticking in one role for over a year. Various titles included PHP Developer, IT manager, SEO Analyst and Configuration and Support Administrator. I didn’t like the people I worked with, and I didn’t like the environments. The training and support was more or less non-existent which was a problem for me, as I didn’t really know what I was doing.
I was also DJing a lot in my spare time, and partying. Brighton is famous for its hedonism and I totally got caught up in that, and had a great time (mostly). At one point I was DJing in clubs two nights mid-week, not getting home till 2am or 3am on those nights, and having to start work the next day at 9am! Needless to say, even with the energy of being young, it took a toll on my work life.
This and the suboptimal career I had, culminated in me burning out quite heavily in 2008/2009. This coincided with the Great Recession in the UK, so jobs were difficult to find. I ended up moving from Brighton to my parents and spent around a year getting better and fitter, cycling every day for hours, and taking on some part-time tech work, but nothing full-time.
In 2010 my parents had had enough of me lounging around the house, so it was time for my next steps. I applied to an MSc course at Kent University, I applied to a tech job in Kent and I applied to the BBC in London. I got accepted by all three, which was nice. In the end, I chose to go with the BBC and moved to London, staying in an incredibly small and expensive flatshare in East Acton and cycling to White City every day.
After a year the BBC moved our department to Manchester, and I was asked if I wanted to go, which I definitely did. I had visited Manchester before in 2009 for a cycling trip while I was unemployed, staying in hostels to minimize cost, and was amazed with the amount of space there was compared to the South East. And the prices too for a big city.
So I ended up moving (2011) to the BBC offices in Media:City UK in Salford Manchester with my girlfriend at the time. Manchester was so cheap back then that we were able to rent a large flat in NumberOne, which was actually attached to the building I was working in! This was very convenient for me, and it was a luxury arrangement compared to life in London.
I spent 7 years at the BBC and learned and a lot about technology and Agile software development. There was a huge investment in learning in our teams, and there was the BBC Academy which ran some good courses on software development. We also got sent to conferences and had coaches come in to give us lessons during our work day. It was a good place to learn.
After a while I realized that it was not a good place for senior engineers and I had watched the budgets steadily been cut back and back over the years. My wage hadn’t really moved for years and I thought it was time for a change.
I moved to Arm (2017) which really was a huge change in a number of ways! It was focused on C++ and embedded software development whereas the BBC was much more about web development. Arm also hadn’t adopted Agile at all, and was not really a collaborative place: it was a place for geniuses who liked to work on their own.
While I definitely liked to work on my own, and I learned a lot while at Arm through their excruciatingly accurate code reviews, the environment was definitely not right for me. I left after two years there.
Fast-forward to today (2022) where I have worked for a couple more organizations and seem to have found a niche as a ‘software automation engineer’: which is a combination of DevOps, QA tester, and developer. I have several years experience covering each, so it is a good role for me, and is in demand.
Ever since I worked at an internet marketing company on an advertising analytics platform, I have realised that I don’t want my personal internet browsing tracked, monetised, influenced, and sold to the highest bidder. These are the steps that I have taken to reduce (you can never totally eliminate) this process.
This is a DNS server installed on a Raspberry Pi on my local home network. I have all the internet traffic going through my Virgin Media router filtered through this DNS server. It has many privacy-boosting features, but its main claim to fame is that it blocks the vast majority of internet advertising and analytics traffic on the DNS level. It currently blocks 20% of the requests made, which results in approximately 20% faster internet for me, and a lot more privacy/less tracking/less adverts.
Using the Firefox Browser is kind of a no-brainer for internet privacy, because of out of all the main browsers available it is open-source and not controlled by a large commercial tech company. It has the best default privacy features out of all the browsers I’ve used. I use it on all my devices and the configuration is synced across all of them.
This is the best web page advert remover I have used. It is constantly updated with new ways of removing adverts as the main companies like Facebook find ways around it. It currently removes all the adverts on all the web pages I browse on, including Facebook, which is quite a feat.
This removes all tracking elements from URLs in web pages you load, automatically. Tracking elements are information passed through in parameters appended to the end of web page links which provide information on where the traffic has come from and the tracked behaviour of the web user on the previous site. This is particularly important in advertising analytics, and breaking this chain between websites does a lot to protect your privacy.
This plugin is not strictly related to privacy but does help an awful lot on online shopping. It analyses Amazon and eBay reviewers for patterns to help understand whether they are fabricated or not. Often online merchants will use fake reviews to boost an otherwise mediocre product. This helps me save money on those.
This is another level of general internet protection from the paid Kaspersky anti-virus product. Kaspersky costs me a small subscription every year but it is better than the free alternatives, and offers this browser plugin which has been helpful in sniffing out malware.
It seems that for a lot of people, perhaps the vast majority, they cannot expect to be 100% happy all the time. Even those incredibly successful celebrities and incredibly rich CEOs and politicians are not happy 100% of the time.
So is it a good idea to seek 100% happiness right away? Or should we always try and select the ‘least worst’ situation? If we keep making progress and optimse our happiness levels through constantly selecting the ‘least worst’ situation whenever we have a descision then it seems to me we will maximise our happiness potential in the long run.
Once we have reached the plateau of happiness for our chosen path though, and we are not getting any happier or there is no way to continue improving our happiness, then the only way of potentially improving our happiness is to do something radical and leap to another approach.
For those with training in A.I. or optimisation algorithms, I see this conceptually as see this as a hill-climbing local optimsation plateau problem. You can optimise locally your happiness level, but you need to take a risk when you have plateau’d in your happiness along your current path, to do something completely different and jump to another hill which might offer a higher level of happiness in the long run, although it may not. The amount of risk you take is dependant on the knowledge you have (the heuristics) that the next ‘hill’ or path you take will lead to a better outcome. But.. if it won’t, and all the paths available to you have been analysed, and you will not make yourself happier, you have won at the happiness problem. You are the happiest you can make yourself and no amount of seeking happiness improvements in your life will help.
This can be extended to job hopping, relationships.. of course there is an amount of risk as we never have a perfect heuristic but the concept is the same. Through constantly hopping hills and constantly seeking 100% happiness you can make yourself less happy than you thought. Maybe you were never born to be 100% happy? Maybe none of us ever were, we can just do the best with the oppertunities we were given.
I don’t know if I explained it well but this does a better job:
Well, 2021 has been a bit of a downer in a number of ways. There has been some upsides though.

Here’s to 2022!
Enlightenment is a very underrated window manager choice, in my opinion. It still looks very pretty and is very configurable. There is a packaging bug with the latest version of Enlightement in the 21.10 repo which means it doesn’t work correctly. The fix is to set the suid bit on the ‘enlightenment_system’ binary. So:
sudo apt install enlightenmentsudo find /usr/lib -type f -name enlightenment_system -exec sudo chmod 4755 {} \;This is a simple description of how I work 99% of the time, as I am a simpleton. Origin/main is the new origin/master for future repositories, I just note both here for completeness because I use origin master for a lot of current repos.
git checkout origin mastergit pull origin mastergit stash pushgit checkout -b <branch name which will be made into a PR>git stash popgit commitgit push origin <branch name which will be made into a PR>git checkout <branch name which will be made into a PR>git pull origin master (or origin main)git mergetool which, for me, is vim’s three way diff tool.git add && git commit && git push origin <branch name which will be made into a PR>git commitgit push origin <branch name which will be made into a PR>As of the day of posting, Plex Media Server has a suboptimal handling of Various Artists compilations. Unless you follow BOTH of these rules, described clearly on the Plex support here under ‘Various Artists’, then they won’t appear collected under a particular album, they will be spread out filed under the different artists that created them. I think it should only require one of these rules, but it is not up to me. The problem is that release metadata available from the online metadata databases, often doesn’t follow these rules – lots of DJ mix compilations for example, do not set albumartist tag to Various Artists from the online metadata databases.
Also you may want to adopt a different file structure for your music than what is recommended and essential for Plex. I would agree that ONE of these measures should be required, and I would argue that setting album artist would be enough for Plex to figure out this problem, but you also need to structure your music also under the way they suggest, you won’t get the desired result of compilations being collected as a single album and in order.
Firstly, you’re going to have to manually add the ‘Various Artists’ content to the ‘albumartist’ tag for all tracks in a compilation that doesn’t have them. Currently I’ve only found a way to do this by hand, would be very interested in any automated approaches, or if someone wants to write a beets.io plugin that would be amazing. You can do this with any tag editor, but I wrote my own solution which is faster for what I want to do and easy to use on my existing Beets.io setup and database which has a lot of these problem compilations already. Because I am using Windows I wrote a batch file which uses several third party tools to fix the metadata fast. You will have to download and setup the tools seperately, details are in the batch file comments.
Secondly, you’re going to have to make sure that Beets.io moves your files into the way that Plex Media Server recommends. This is my current Beets.io config file, the important bits here are the file rename and move structure, as per the support page, it has to be something along the lines of:
$albumartist/$album/$artist - $title
All my Fabric mix CDs are now properly collected under one ordered album each on Plex: 

I have recently been in hospital and been diagnosed with a condition that might mean I need to return quite a bit, at least in the short term. When I was in hospital I was struck by the fact that there were very long periods of waiting and it was easy to get very bored and quite dejected just sitting in a hospital bed.
Also there is not a lot of room for laptops, tablets and other things – you really don’t get a lot of space by your bed usually to store large items and they are not practical most of the time. Therefore I thought I would hack together some kind of portable entertainment system that I could use to pass the time and to block out some of the hospital negativity if I need to be in hospital again. My DJ headphones Seinhausser HD 2-IIs are actually very useful in a hospital because they are very good at sound isolation and you can remove one of the ear cups so you can lie on your side in a hospital bed and just listen to one earcup without it being uncomfortable, so they were very good to use with the PSP.
I chose the PSP 2000 model as it is very capable of playing emulated games up to Playstation 1 era, which includes my favourites the GBA, SNES and Genesis games. It also has option to watch Sony UMD movies, and the screen is actually very good and clear in the dark and most light settings.
I went through Etsy until I found a seller that was selling custom PSPs. They came with a tested battery, a mint condition screen and you could choose from a number of different cases. I chose the rare special edition Japanese signature Model 000001 Tsukimi case and it came to quite a reasonable price overall, £160 for everything although no memory card was supplied.
When it arrived, I was a bit worried that the screen would be scratched, but when I peeled off the screen protector there was zero damage to the screen. In all other ways it seemed mint, so was very happy. The battery was an official Sony one which still held a charge well, which I was very happy about because it is difficult to find a good battery.
I peeled off the screen protector and put on a new one straight away. I also ordered a 32GB PSP memory card, and a joint USB charge/data transfer cable. When the card arrived I put on the PSP 2000 ‘PRO’ Custom Firmware, allowing me to ‘root’ the device and install third-party software such as emulators on it. I then installed a PSP Snes9x version and downloaded a full complete set of SNES games and copied them to the memory card. I had to split the games up into folders of 200 games or so each otherwise the PSP struggled indexing all the games, but when I had done that they all worked. I could play any Super Nintendo game ever released on the emulator on my PSP and take them anywhere.
I also bought a hardshell carry case for my PSP which will have enough room for a charger, a few Sony UMD disks and the PSP. The PSP 2000 models are different from the 1000 models in that they actually have a HDMI cable available, so you can connect them to a HDMI monitor. So I bought one of those to play when I am home at my desk with my HDMI monitor – it is a much better user experience! See the picture below, it even works well in my 21:9 ultrawide monitor after fiddling with various upscaling options:

I already had a couple of Sony UMD discs and they are very cheap on Ebay, so I splashed out and ordered a complete set of the Harry Potter 1-8 movies. I could definitely just rip movies and put them on the memory card and it would save a lot of hassle but I like the UMD format and as I said they are very cheap nowadays. I may put some additional video file rips on the memory card.
I got ALL the information I could have wanted for this project from the excellent Reddit subreddit ‘PSP’. Reddit is a font of useful, up to date, technical info and just following the wiki and top links on that subreddit really was all that was required to do everything I needed.

Sometimes as a DJ you may want to reconstruct the Twitch stream you have streamed into a video format to send to other people, for promotional purposes, or just to have a record of what you’ve done. Twitch makes this difficult though, as it mutes copyrighted music in the video it records for your Twitch stream. Also, when you download this video, it does not include the chat log, so any attempts at reconstruction are without the chat, so it looks like the DJ is just talking to him/herself. Not good. However you can get past this. This is how I reconstruct a video set to create a promo DJ video mix for my stream. You will need:
Just browse to your video section of the creator dashboard and you will have an oppertunity to download the video of your Twitch stream.
Make sure your audio recording is published on your Mixcloud and just use the site https://www.dlmixcloud.com to download a m4a copy of your audio stream.
This is a great program but is a bit technical. There are two steps you need to do – 1) download the chat logs from a VOD and then 2) Render them into a video. So for example:
.\TwitchDownloaderCLI.exe -m ChatDownload -u 1055017670 -o bla.json
– where 1055017670 is your VOD ID (find this by browsing to your video on Twitch. the VOD ID will be displayed in the URL)
.\TwitchDownloaderCLI -m ChatRender -i bla.json -h 540 -w 212 --framerate 30 --update-rate 0 --font-size 11 -o chat.mp4
– this will render your chat playback in a video file with the dimensions 540x212px and the font-size of 11. This is what I use, you can edit this to suit your tastes.
Once you have these three elements, you can use any good video editor to sync the audio with the video, and overlay the chat video onto the video of your stream. Add some titles and there you have a promo video.
You may run into problems distributing your video as services like YouTube will flag up that you are using copyrighted music. However you can use the fantastic Handbrake tool to compress your video file into a small filesize, and then upload the resulting video to Google Drive. Then you can set Google Drive to ‘share via link’ and distribute that link to people you want to watch your video. They will sometimes be offered a live stream option but for best results they need to download the whole video file (so make it small!) and watch in a video player like Windows Media Player.
Remember to download the whole file for best results: https://drive.google.com/file/d/1qezKXSAvBK29hUCcuRNx1i3-fnodVss9/view
You should (maybe) also be able to preview it here:
As a DJ it is important to listen to the music in your collection so you get an idea of what would work in particular sets, and you have a memory of how the tracks progress. So I decided to host a Spotify like service in my house so I could listen to my 500GB+ DJ music library. Navidrome (free open source software from https://navidrome.org) is running on the Raspberry Pi 3 which is under my desk via a wired connection with it’s own http://navidrome.local custom domain name. This is what it looks like:

It remotely mounts the music share on my main Windows PC which is almost always on, and quickly indexes and serves up the content in a Spotify type way.
I have setup an iptables port redirect so that any web traffic to port 80 or port 443 will be redirected to the correct navidrome app port so I don’t have to remember the obscure port number just the domain name above. I have also setup AutoFS to automatically detect when my main PC is running and mount the windows share automatically, so everything just works whenever my main PC is switched on and off, and docker-compose automatically loads the container whenever it goes down and the setup persists between reboots of the RPI and the windows PC. I have also installed Plex on the same RPI, using AutoFS so that it mounts and unmounts the video share on my other PC when it is switched on. I have ripped a bunch of comedy videos from my DVDs and BluRays using Handbrake.
Navidrome implements the Subsonic API, so it is compatible with a lot of different applications, including the excellent DSub application for Android which offers a more mobile-friendly streamlined player that connects to my Navidrome server and allows caching and pre-downloading, and a bunch of other cool features.
It provides an easy way for me to browse and play any music from my music collection from anywhere on my network, and it has full metadata added as part of my DJ music metadata workflow (see: https://davidcraddock.net/2021/05/05/organising-huge-music-libraries-with-serato/ for more info). I have also setup my RPI3 as a ZeroTier bridge to my local network, meaning I can create a P2P VPN from my phone to stream music via DSub when I am outside the house too, or to access Plex on the RPI from my phone while I’m on the move.
Another useful feature is that I can save playlists using Navidrome and download all the files that make up the playlist via the web interface. This is useful for preparing a set and moving all teh files onto my DJing laptop so that I can analyse them in Serato and play them in a Serato crate.
Follow this and only this guide. This is the best vinyl setup video on the internet as of 2021:
A lot of DJ turntables are based on Technics OEM clones, and so you will need to set the tonearm height, which is the only thing not covered by the above video:
Once you’ve setup your turntable:
0) Should go without saying that I always use a velvet dust brush on my records just before I play them. Only takes a couple of seconds when you’re used to doing it.
1) I always use a stylus guard or record player dust cover when not using my decks.
2) I regularly clean my stylus/needle either by blowing or (how you’re supposed to do it) with a stylus cleaning brush.
3) I highly recommend you get one of these tracking weight scales: https://www.amazon.co.uk/Precise-Digital-Turntable-Backlight-Cartridge/dp/B08DKR87ZC/
and a small 10cm or so spirit level.
4) If you are dealing with expensive records, records you care about, or records that you think one day might become expensive, I do think it is a worthwhile investment to get a set of good outer covers for the vinyl jackets and some good quality inner sleeves to replace the inner sleeves (often printed paper) that come with the record. You typically put the old sleeves next to the record in the outer sleeve so they don’t get worn down by use. This will cut down the amount of dust and static that accumalates also. Take the digital download cards out of the records when you open them – if you leave them sealed with your record for years they can cause compression marks on the vinyl. I usually redeem them online once I buy the record and then rip up the digital download card.
5) Vinyl is an analogue medium. Occassionally things are going to go wrong – you’re going to get some fluff on your stylus and the record will stop tracking properly, or the record is going to skip, or there will be crackling from surface noise, dust, dirt, whatever. You will have to take action, usually involing lifting the needle from the record, often in the middle of your set. Be prepared, but you can always remind the audience jokingly that you are actually playing real records – they will (hopefully) understand it’s not like pressing a button.
6) Needle drops. I do not recommend beginner DJs start dropping the needle manually onto their records. On every record deck there will be a lever that gently lowers the needle into position on the record, and raises it when reversed. It IS possible to bypass this and drop the needle manually and gently on the record without using the lever, and lots of very experienced DJs can do it so well that there is no long-term damage to the needle and they are faster and often more accurate than using the lever, but doing it this way there is much more of a risk when starting out that you will scratch your records. Scratch DJs and old timer vinyl DJs drop the needle all the time, and good for them. Until you are more used to everything I recommend you use the lever.
7) Flight cases. You can get cheap second hand flightcases that have lasted decades and probably will last decades more. You’re looking for something sturdy and mostly metal but as light as possible. Make sure there are no dents and the catches operate like they should, and your decks and mixer snugly fit in without any movement. Coffin style flightcases are a popular option for vinyl DJs as they reduce setup time, but they are pretty heavy. Remember to check with the venue how much space you will have and will they have a table or booth you can put your entire setup on. A lot of venues are used to much smaller controller setups so check first.
8) Record boxes/bags. There are lots of different options here. I would recommend a secondhand metal flightcase style record box which is as light as possible, opens up at the front so you have plenty of space to shuffle through the records, and has wheels and a handle so you can pull it around like a suitcase. A full record box can be VERY VERY heavy! Only take the ones you know are going to go down well. There is a lot less manouvering space in your set for real vinyl DJing as opposed to just turning up with a controller and 20k songs to choose from, so you have to plan things more. Get a good idea what type of music you are booked for, and what people are likely to like. Make sure the records you have are good quality and will not skip or cause you problems. Remember to keep records away from direct sunlight – they will warp. A good habit is to put them back in the box once you’ve played them. They should always be kept standing up vertically, never stack them horizontally as the weight can cause problems for the bottom records. You may opt to leave behind all the outer sleeves and inlays etc and put each record in your record box only in a paper inner sleeve where you can write the artist, the track, the position on the record, and the BPM, and anything else you want to make selection easier. Colour coded stickers can be useful. Don’t assume you will have light in a darkened environment to read your inner sleeves, and I wouldn’t rely on your mobile phone torch – it uses up battery and you might need it for other things. You can get clip-on battery powered lights or keyring pencil torches that last for ages on a single battery.
Once every month or so, I do this:
A) Check the spirit level on the platter of your turntable without a record, to make sure that from top to bottom, from left to right, and from the center to the outside of the platter, everything is stable. If anything is off, use the adjustable feet on your decks to make sure everything is level, or put some cut up cardboard under one of the legs to lift it, if you don’t have adjustable feet.
B) Use the scale recommended above to check the tracking weight, again without a record on. Make sure it is within your cartridge acceptable weight range, but relatively low within that range unless you’re doing a lot of scratching. Higher tracking weight = quicker burnout of needle and record, but closer tracking when you scratch.
C) If you are using DVS, use some vinyl record cleaner to clean the DVS timecode records you’re using, and wipe them clean.
D) If you are using DVS, recalibrate the decks using the DVS software so that it uses the right sensitivity after any adjustments you have made.
E) Check all the connections on the back of your turntables, make sure they are tightly plugged in, occasionally they become loose over time and with knocks, and that can cause problems.
F) Check the speed of your platter is stable and spot on at different speeds – most OEM Technics style clones have a small strobe light and a number of dots. Learn how to use those to quickly check that all is in order.
That’s it. That’s all you need to do to make sure your equipment is reliable and lasts a long time.

For Phillips Hue sources I use Hue Sync on my broadcast PC which syncs the lights in time with the music. I will use different palletes depending on the event. For darkwave/dark music style events I will use this pallette:

I will have the ‘Live on Air’ sign on, but not the disco balls or the laser.
For lighter/retro music settings such as my bi-weekly ‘DJ’s Choice’ I will use the following settings:

I will have the ‘Live on Air’ sign on, and the disco balls and laser.
All cameras are mounted on tripods and require a USB port. Most have USB extension cables.
Updated: 25-11-22
My music library is around 24k files, mostly FLAC and some 320kbps MP3s. I use the following tools to organise my music library:
Acquisition:
dbPoweramp CD Ripper – https://www.dbpoweramp.com/cd-ripper.htm
Bandcamp Collection Downloader – https://github.com/Ezwen/bandcamp-collection-downloader
Soulseek – http://www.slsknet.org
Tagging and Metadata:
Beets – https://beets.io
Mixed In Key – https://mixedinkey.com
Lexicon https://www.lexicondj.com/
Backup and sync:
Robocopy – comes free with Windows 10. Documentation: https://docs.microsoft.com/en-us/windows-server/administration/windows-commands/robocopy
Google Drive
Rsync
Searching:
Everything Search – https://voidtools.com/
Playing:
Winamp
Serato DJ Pro – https://serato.com/dj/pro
Plex Media Server – https://www.plex.tv/
dbPoweramp CD Ripper
I have found this to be the fastest and most reliable CD ripper. It is commercial but is a very small cost and contains access to a lot of metadata services. I rip all my CDs to FLAC.
Bandcamp Collection Downloader
This is so useful. It required a few tweaks to get to work reliably under Windows, and if you haven’t got any scripting skills then it will be a pain, but it has been hugely useful in syncing my Bandcamp purchases, of which I have over 200. It checks whether it has downloaded a purchase before as well, so you don’t need to re-download everything, just what has been added recently to your collection. I use the following settings in a batch file which works reliably. If you want to use it you will have to replace ‘socialistsynthesis’ to be your bandcamp username. Remember to download the latest JDK NOT just the latest JRE otherwise it won’t work.
java -jar bandcamp-collection-downloader.jar -f=flac -j=1 -r=3 socialistsynthesis
Soulseek
I make a genuinely huge attempt to purchase all the music I play for my stream. I have spent SO much money on digital and physical copies of music over the years. When something is not available for purchase, or I have an old MP3 rip from a CD and I want a FLAC, then I use Soulseek. Whether you do is up to you, just know that it is there.
Beets.IO
I use Beets.io to manage all tagging. It is extremely powerful if you are comfortable with the commandline. This is my current config:
plugins: duplicates replaygain the ftintitle discogs bandcamp badfiles embedart fetchart

directory: /mnt2/music/
import:
copy: no
replaygain:
command: /usr/bin/mp3gain
targetlevel: 92
overwrite: no
auto: yes
backend: command
threads: 20
parallel_on_import: no
per_disc: no
peak: ‘true’
r128: [Opus]
r128_targetlevel: 84
noclip: yes
paths:
default: ‘%the{$albumartist}/$album/$artist – $title $bpm’
singleton: ‘%the{$albumartist}/$artist – $title $bpm’
comp: ‘%the{$albumartist}/artist – $title $bpm’
the:
the: yes
a: yes
format: ‘{0}, {1}’
strip: no
patterns: []
discogs:
apikey: REDACTED
apisecret: REDACTED
tokenfile: discogs_token.json
source_weight: 0.5
user_token: REDACTED
separator: ‘, ‘
index_tracks: no
ftintitle:
auto: yes
drop: no
format: feat. {0}
duplicates:
album: no
checksum: ”
copy: ”
count: no
delete: no
format: ”
full: no
keys: []
merge: no
move: ”
path: no
tiebreak: {}
strict: no
tag: ”
badfiles:
check_on_import: yes
commands:
flac: flac –test –warnings-as-errors –silent
va_name: Various Artists
fetchart:
cautious: yes
cover_names: front back
auto: yes
minwidth: 0
maxwidth: 0
quality: 0
max_filesize: 0
enforce_ratio: no
sources:
– filesystem
– coverart
– itunes
– amazon
– albumart
google_key: REDACTED
google_engine: 001442825323518660753:hrh5ch1gjzm
fanarttv_key: REDACTED
lastfm_key: REDACTED
store_source: no
high_resolution: no
deinterlace: no
cover_format:
embedart:
maxwidth: 0
auto: yes
compare_threshold: 0
ifempty: no
remove_art_file: no
quality: 0
I use the following plugins:
duplicates – for removing duplicates
replaygain – for setting the gain level for the track intelligently in the file as analysed by mp3gain.exe
the – For organising artists which contain the word ‘The’. For example ‘The Chemical Brothers’ becomes ‘Chemical Brothers, The’ on the top level directory.
discogs – Provide metadata from Discogs.
bandcamp – Provide metadata from Bandcamp.
ftintitle – This moves all the ‘featured artists’ in song names and albums into the title of the song.
badfiles – Run file integrity checkers on imported files to get rid of corrupt files
fetchart – Fetch artwork for each track
embedart – And embed it into the file
I structure the music in my library like so:
S:\audio\music\Chemical Brothers, The\Surrender\The Chemical Brothers - Under The Influence 135.mp3
S:\audio\music – my music collection top level folder.Chemical Brothers, The – the artist with ‘The’ moved to the end for easy scanning through the artists list.Surrender – the album.The Chemical Brothers – the full name of the artist.Under The Influence – the full name of the track.135 – the BPM of the track..mp3 – the file extension – usually either flac or mp3.My Beets.io workflow:
beet import -AmPsq .beet dup -d to delete any duplicates that have arisen.Mixed in Key
This has the best key detection and mood detection algorithms at the moment. I use it to analyse small sets of files for more planned sets
Lexicon
This has so much potential but I haven’t dug into it yet properly. My subscription expired so now I have to wait until I have enough money to get another one. You can perform a lot of useful tricks using your libraries metadata.
Everything Search
This is a free Windows-only program that searches for files extremely quickly. It is so fast that I can get results from all my media files in a couple of seconds when I am searching for something while I am DJing on Twitch.
Backup Software
I use rclone on my Linux server to backup my music to Google Drive, where I have 8TB of storage.
Winamp
Now that Winamp is updated for Windows 11 and is being actively maintained, I use it as a primary music player whenever I’m not use Plex Music Player.
Serato DJ Pro
This is what I use for my DJing when playing live. I analyze all my files to set the beatgrid, BPM and key. I have a 2TB external USB 2.0 hard disk so analyzing my entire library takes a couple of days of leaving my Macbook Pro on. But for new smaller additions it is much faster.
I use Serato autocrates a lot to mine the large amount of metadata I’ve added as part of my process. I have seperate autocrates for each 10 BPM division, e.g. 71-80 BPM, 81-90 BPM etc. I also have autocrates set by release date – I have music released in the 80s, music released in the 90s, music released in the 00s…etc. There is so much you can do with autocrates if you have properly set metadata.
Plex Media Server
I subscribe to Plex Media Server which is where I put all my music and video files for non-DJing playback. Because I subscribe (you can get the basic server and almost all functionality for free) I get access to the wonderful PlexAmp player which is a really great service. I have it on all my mobile devices and computers. Plex Media Server’s handling of ‘Various Artists’ compilations is problematic and I have written about it on this blog. I use a script I put together to fix problems when I encounter them. With the latest version of Beets.io you can get very specific with the ‘beets ls’ query language so this script works very accuratedly.

I have retired the Novation SL Zero Mk1 MIDI controller that was causing me a lot of grief when I was running Resolume and Ableton Live at the same time, as its Automap functionality was locking on to the Ableton Live mixer in session view now and then, and so, sometimes, when I thought I was controlling Resolumes visual FX, I was actually changing the volume faders in my DJ mix. Which was bad.
I have replaced it with the even older but classic Behringer BCF2000. I use the sliders to control the 8 dashboard visual FX controls on Resolume. I also have attached two pedals to the BCF2000. The first one, the sustain on/off switch pedal, I have mapped to control whether Resolume is running in autopilot mode or just looping the current visual. This will allow me to set it on autopilot through most of the set and then focus on one visual when I want to do some more involved stuff. The expression pedal, I have set to control the opacity of the top layer. I run Resolume with two layers, the main layer which is usually a background of an animation, and then the ‘extra lines and bars and stuff on top’ layer. So when I gradually depress and release the expression pedal, I fade in and fade out the ‘extra stuff’ layer from the scene.
I have additionally mapped four buttons on the Behringer BCF2000 to manually skip forward and backwards each layer through the prepared layer list. So if one layer is boring or I want to select something specific I have some control over that without having to open the Resolume window on the PC.
So far I’m happy with the autopilot setup I’ve got. I want to spend more time on Resolume and the VJing side of my stream, but for now this will do and will offer sufficient variety.

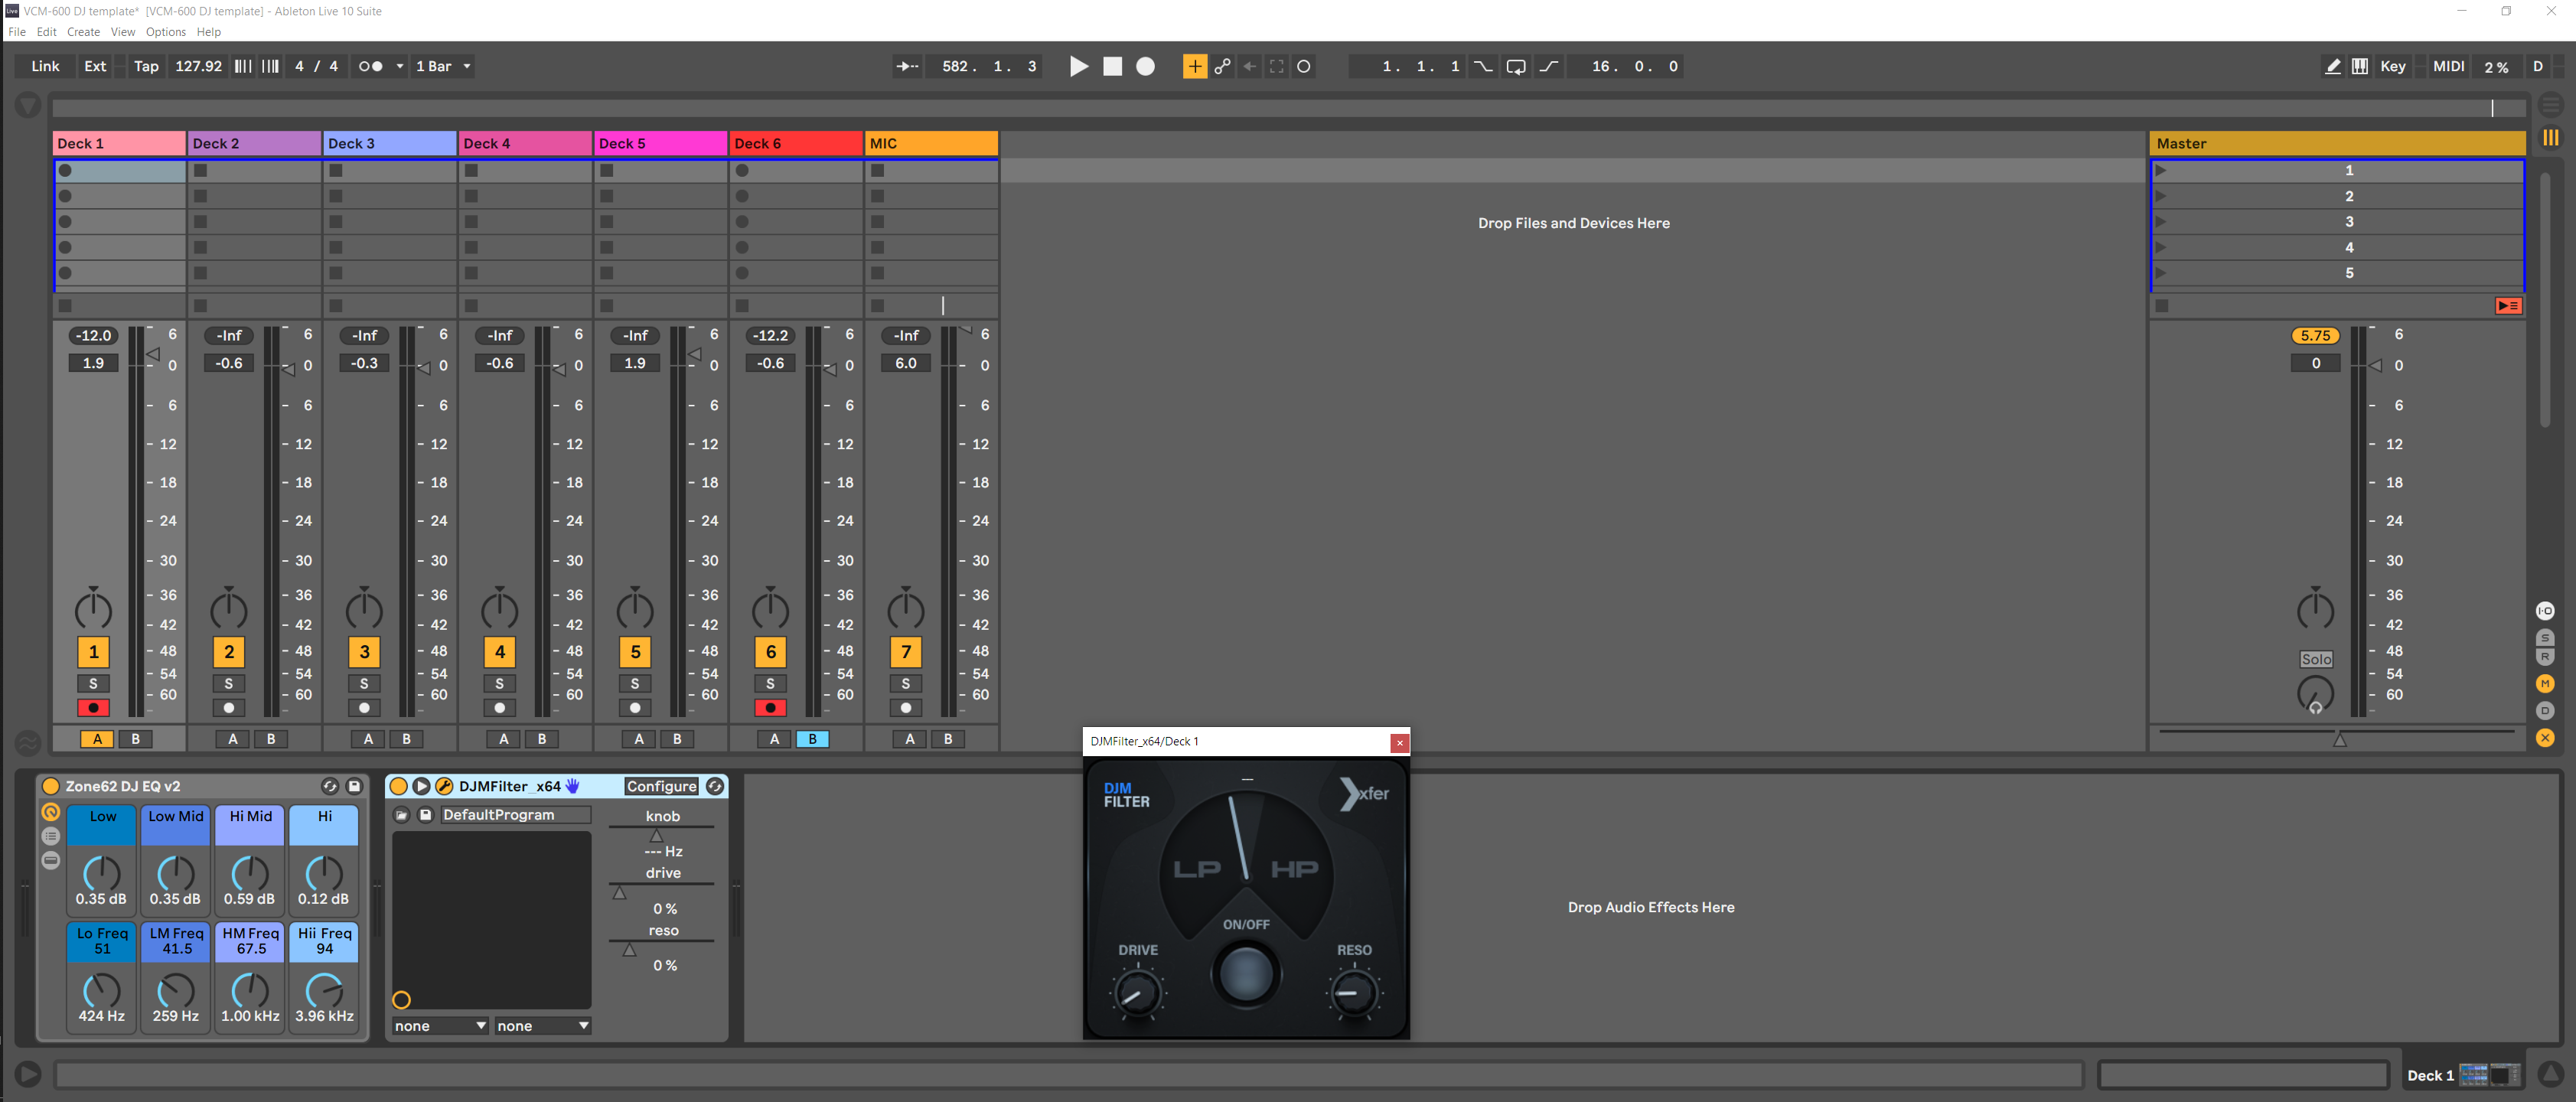
I recently found a good price on a Vestax VCM-600 controller. It is a specially made MIDI controller for Ableton Live, with the same build quality as a DJ mixer. It allows for control over 6 channels in the Ableton Live ‘session’ view, which is arranged similarly to a mixing console. It also adds dozens of MIDI mappable DJ controls such as the traditional Hi, Mid and Lo EQs, a crossfader, a filter control, control over a lot of Ableton FX, and more. It has 6 channel faders + 2 send faders for FX. More info in this video:
It replaces my Pioneer DJM-S3 mixer. I use a 4×4 interface compatible with Serato DJ Pro DVS, the Denon DS1, and run the timecode audio from the Reloop 8000Mk2 decks through the Denon DS1. It outputs the Serato DJ Pro modified audio for both decks. The outputs of the DS1 are connected via a Douk VU-Meter (to see the levels for both decks for accurate gain control while mixing) to the Behringer UMC1820 audio interface which is connected to my broadcast PC running Ableton.
When I move the faders on the Vestax VCM-600 controller attached to the broadcast PC, it functions as a DJ mixer, with the actual mixing taking place in Ableton through the UMC1820 audio interface.
The microphone for streaming is connected to the sound interface as usual, and the DJ headphones are connected to the headphone amp on the the sound interface, with mic levels and cueing dealt with via Ableton Live.
The advantages of this setup over my previous setup are multifold, as I now have a 6 channel fully configurable mixer. Firstly it will allow me to bring in various external hardware instruments such as drum machines, hardware synths etc, all controlled via Ableton. I could also bring in software instruments/VSTs. It would allow me to use high quality studio software FX in my DJ sets. It would also allow me to trigger samples from Ableton Live and have them output on one of the channels, synced to the beat.
I am currently using the 4-band X:One EQ filter Ableton FX Unit clone from https://tarekith.com/freestuff/, see: https://forum.ableton.com/viewtopic.php?t=144388 .
I am also using the https://xferrecords.com/freeware DJM-900 filter clone. I have adapted these both into my Ableton VCM600 template set. I might release this set later once I’ve built it up more with Ableton FX.
I am currently using Serato DJ Pro FX controlled by my Akai SP8 cheap controller connected to my DJ laptop, which I have changed the knobs on to make them more tactile. I also have an Ableton Push mk1 controller hooked up to broadcast PC which is useful for multiple things, but mostly for quickly controlling Ableton Live without having to mess around with the mouse. I have not synced the BPM automatically yet between Serato and Ableton; Serato has a problem with Ableton Link integration I found. For the moment, I am using the Serato DJ Pro beat-synced FX on Serato, and using tap-tempo on my Ableton Push controller to set the BPM in Ableton Live. I don’t need the BPM to be exact at the moment for Ableton Live as I am not using any beat-synced FX or looping FX on Ableton.
Looping, beat repeat, cue point jumping, tempo, sync, scratching and platter changes for each deck are handled by the controls on the Reloop 8000mk2 which are both connected via USB to Serato on the DJ laptop, so they function as a DVS system but with also pads and controls for Serato too.
I am using Resolume on my broadcast PC. I run a number of scenes on autopilot mode, and use the ancient Novation SL1 Mk1 MIDI controller to apply video FX to Resolume. I sync the BPM to Resolume through Ableton Link, with Ableton Live setting the BPM for Resolume through Ableton Link, and me setting the BPM for Ableton Live using the tap-tempo on the Ableton Push controller.
I have a sustain pedal which I use to trigger the ‘ducking’ affect in Ableton when I want to talk over the music.. when the pedal is depressed, the music fades down and the mic up a bit, so people can hear me better. When the pedal is let go, the microphone volume is killed so no background noise is picked up.

Here it is in action – the clicks are me flipping the crossfader or the channel faders on the VCM-600:
As you can see from the video, the latency really isn’t an issue. It’s very responsive even though the timecode audio from the turntables is being processed by the Denon DS1, sent through the Douk VU-meter, and then converted to digital signals by the UMC1820 sound interface, sent through an EQ and FX chain, and mixed by Ableton according to the VCM600 DJ controller movements.
Here is a flowchart which should help explain the signal flow:
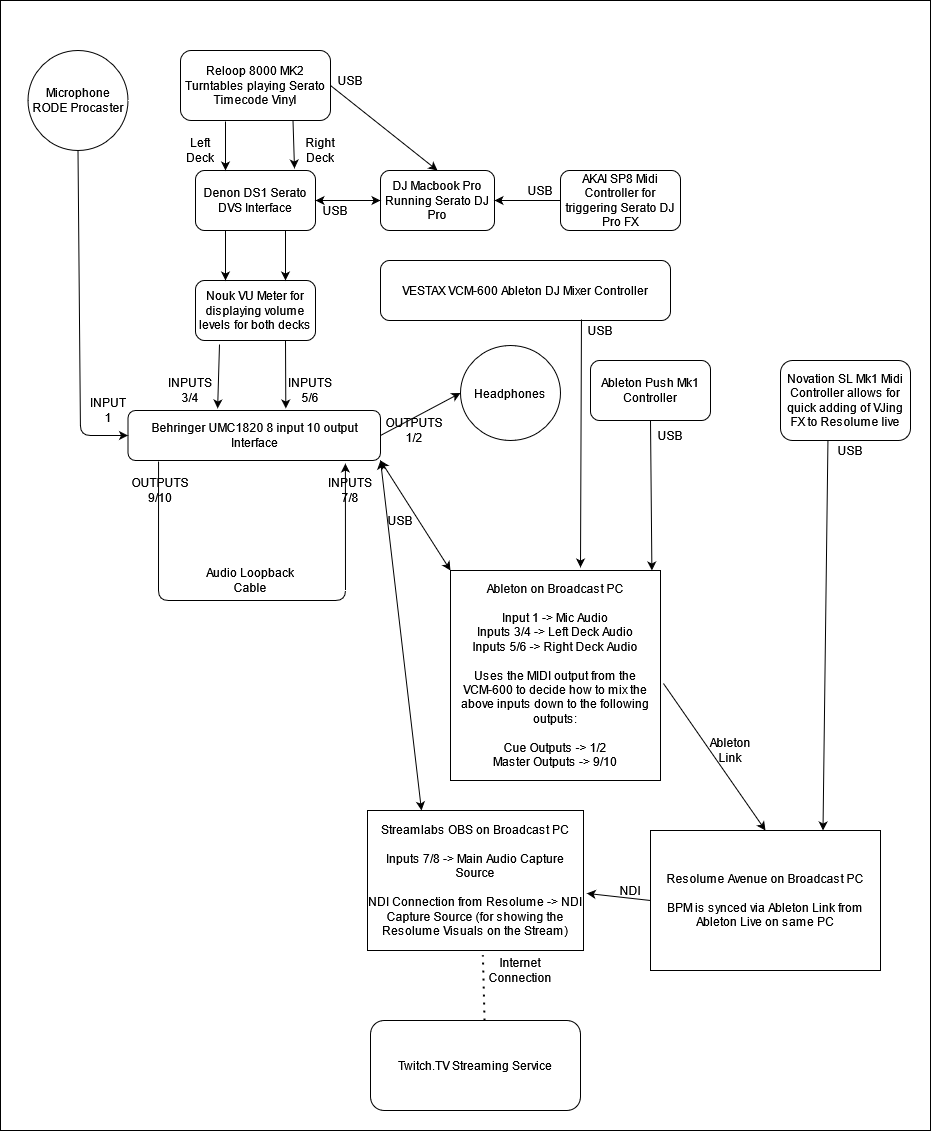
Here is a list of equipment that I use:
For new equipment I use Thomann.de often or DV247.com, or Amazon, or whatever is cheaper on Google Shopping.
For used equipment I use Reverb.com or Ebay.co.uk or occasionally Facebook adverts.
I think, for obvious reasons, 2020 has been a year that no-one could really have expected. With COVID-19 and lockdown, a lot of things have changed, both in my life, in everyone’s lives, and in the workplace.


After the last post I have added Ableton Live and my Eurorack modular to my DJ setup, with a master clock being sent via MIDI cables from my Roland TR8 drum machine that syncs with Ableton. The drum machine also can be used creatively for drum fills etc.
I hope these two diagrams explain my setup adequately – sometimes a picture is worth a thousand words! The ‘actor’ is me – I just couldn’t find a way to change that on http://draw.io 🙂
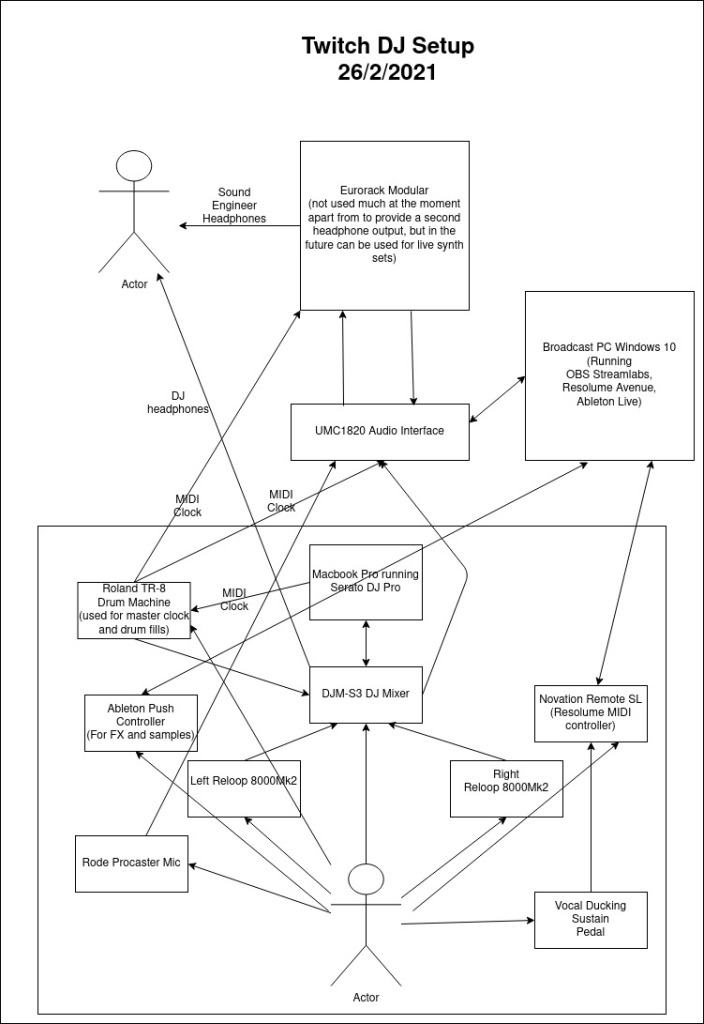


Yes! Some people actually write and read BOOKS on DJing. As if YouTube wasn’t enough. Well it can be enough.. but YouTube is also a cess pit of rubbish information, and at least a book has a better chance of being properly edited and reviewed. Also reading a book makes you more intellectual. Which is utterly true.
So. I have been reading through these DJing books to see if they could teach me something I didn’t know about DJing after over 10 years doing it. And there were quite a few interesting techniques and tricks that I learned from these.
How to DJ (Properly) – Frank Broughton, Bill Brewster (2003)
This is a great old book that I first bought when I was getting into DJing back around 2000. It covers so much technical and non-technical information that is still highly relevant today, but some parts are laughably out of date. I really wish they would update this book and put out a new version. A lot of the non-technical stuff you won’t find elsewhere and is really useful still. Definitely worth a read but don’t expect a modern take on things.
https://www.goodreads.com/book/show/1889346.How_To_DJ_Properly_
FutureDJs: How to DJ – Austen Smart, Scott Smart, Tom Dent (2019)
This is the book you want if you want a modern and uptodate introduction to DJing. It was designed as a textbook to help train high school music teachers so they could include DJing tuition in their classrooms. It’s amazing – really great – and contains lots of diagrams which help the explanation. If you want to get just one book on DJing buy this.
Rock The Dancefloor: The proven five-step formula for total DJing success – Phil Morse (2016)
I have to say straight away that I am quite biased as I don’t actually like Phil Morse of DigitalDJTips.com fame. I don’t find his reviews to be that accurate and often seem a bit like advertisements of products. I have learned some things from his website but not a huge amount. However this book has got lots of great reviews so I thought I’d mention it. I do have a copy but I found it a bit difficult to get through as it is all written in Phil’s quite conversational prose, with no diagrams or pictures or anything really to break it up. It may well be worth checking out to see if you can get anything from it though. I will probably try and get through it myself and give it a proper review, but just so you know it’s out there.
https://www.goodreads.com/book/show/31545542-rock-the-dancefloor
Beyond Beatmatching: Take Your DJ Career to the Next Level – Yakov Vorobyev, Eric Coomes, Bill Murphy (2012)
This is quite an interesting and quite advanced book by the developers of Mixed in Key. In it, they talk about using MIK’s features to detect musical key and energy level, and how you can use those features to plan your set around harmonic mixes and energy level arcs. It is quite advanced and very interesting. MIK is a pretty good piece of software, I have had it crash a few times when analysing very big libraries but generally it is pretty solid. I recommend checking this out, because although the basics of harmonic mixing are probably talked about in any recent DJing book, this goes into greater depth.
https://www.goodreads.com/en/book/show/19218202-beyond-beatmatching
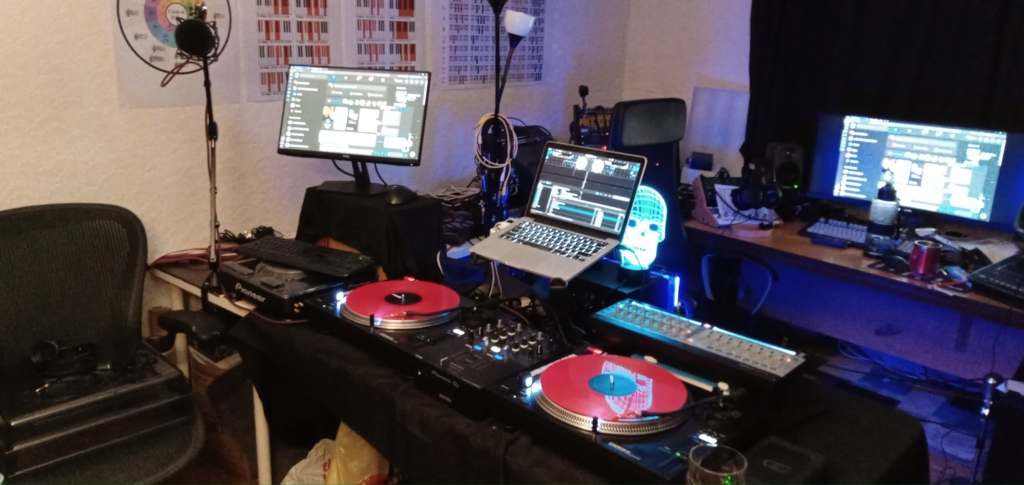
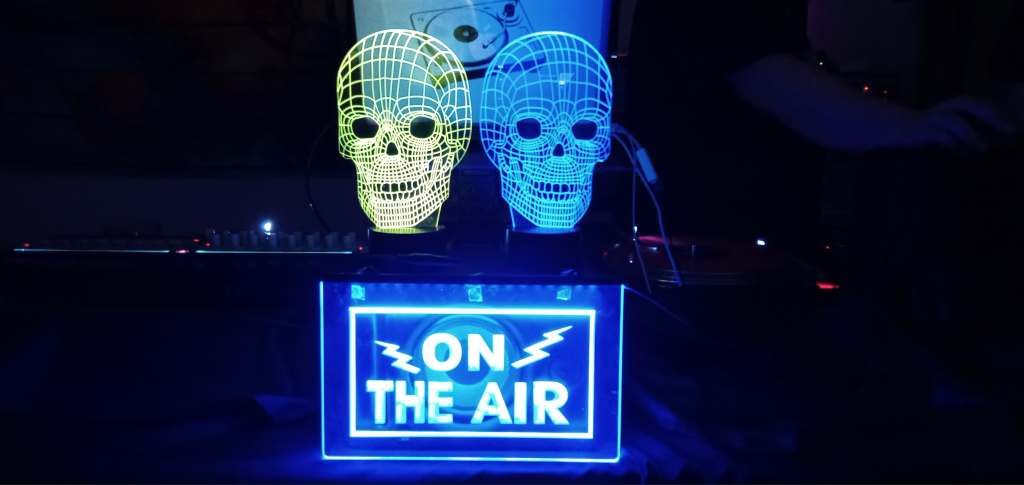

I thought I’d write a bit here about my Twitch DJing setup and some of the hardware and software I’m using. Twitch streaming has become very popular over the lockdown period, and I think people might be interested in how I have configured my stream. Something that seperates my stream from anyone else I’ve seen on Twitch is that is that I do live vinyl DJing AND live VJing at the same time on my stream. This is how I achieve it.
Broadcast PC
This is my main desktop PC that I use for personal use as well as streaming. It has a Nvidia 1080 graphics card which is very useful with Resolume Avenue, the VJing software I use. I have one main big monitor and one smaller second monitor which I have attached to a long HDMI cable and placed next to my DJing desk along with a second mouse and keyboard which goes into a USB 3.0 hub and a long USB 3.0 extension cable. When I go to DJ I set the Windows graphical settings to duplicate my screen on both screens, so I can control the broadcast computer from where I am standing next to my DJ equipment. I have a Behringer UMC1820 sound interface which has 8 balanced phono inputs. Inputs 5&6 are permanently connected to my DJ mixer, and I use Input 1 for my microphone.
Broadcasting Software
I use Streamlabs OBS on my broadcast PC. I did initially subscribe so they let me download one of their custom themes, which I have heavily edited but still remains integral to my setup. For some reason even though my subscription has lapsed that has not made any difference to whether I can continue using this theme and the app, although it has turned my follow/subscription/bit notifications back to the plain old free ones. I prefer it over free OBS for three features at least.
Firstly, the studio mode – I am not sure if OBS free has this (maybe it does?) but it is useful when fixing things live to have two scenes active, one which is being broadcast and one which is only visible to me. Secondly, the way you can order the layers on the scene, this is very intuitive to me and was more intuitive than the layering (front to back) on OBS free. Thirdly, the remote control element.. I have a remote control app for my Android tablet and phone which allows me to quickly cycle through scenes – no need to shell out for fancy scene controllers.
I use the free NDI tools for NDI streams to Streamlabs OBS for the external video elements on my screen – one from Resolume Avenue on my broadcast PC and the second from my Macbook Pro which is running Serato Video. I also use streamelements and Moobot to enable kappagen effects, and to moderate the chat and provide information to chatters.
Cameras
2x Logitech C920 web cams on tripods. I bought them because I saw them used at the BBC where I used to work. I think if I had more USB3 ports on my computer the bandwidth for these cameras would be increased and the resolution would be wider, but as they are, they are really solid. I’ve only had occasional problems with the auto-focus when there is a lot of lighting strobing going on.
DJing Equipment
I have a pair of Reloop 8000mk2 turntables with a Pioneer DJM-S3 Serato mixer. Both integrate really well with Serato and offer additional performance features. I use Serato on my aging Macbook Pro 2015 and have actually got it to reliably output Serato Video using NDI capture tool and send it over the network to my broadcasting computer without the fan having to spin up. I only use Serato on my Macbook because I don’t want to burden it – it is doing enough as it is! I have a 2TB external HD where I put all my digital music files and have it mounted as a network share so I can transfer files over the network from my main PC. I use Mixed in Key to add Serato cue points to music I use, and the free MusicBrainz Picard to correctly tag files and organise my music collection.
Lighting
I use Phillips Hue lightsources and the hyeDynamic Windows 10 app. It connects to the Hue hub strobes the lights in time with an audio input. I have a Hue Lightstrip and 4x Hue Colour bulbs and they all sync together. I also have a small laser unit that syncs in time with the beat and is useful as added background lighting.
VJing
I use Resolume Avenue with a number of clips I have commercially bought. I have it running mostly in autopilot mode with all the clips synced to the beat. The beat is provided by a free app called ‘AudioBoxBaby’ which I am really looking to replace, but there is simply nothing else out there on the market. It detects the approximate BPM of any audio coming in on my sound interface from my DJ mixer, and translates it into a single repeating midi note. This midi note I have mapped to the tap tempo button in Resolume so it is like a human tapping the tempo along with the music in theory. Serato DJ Pro supports Ableton Link, and so does Resolume Avenue, but I have found that syncing via Ableton Link to be very problematic when using Serato, and of course it doesn’t work when not using Serato, for example with all vinyl sets.
I also have a Novation Zero SL controller which I have had for over 10 years and still works perfectly, so I really recommend it! It is attached via a USB extension cable to my broadcasting PC and I use it to control some basic VJing effects that I put over the audiopilot clips to create buildups and visual changes in time with the music. It has 8 sliders and I move them in time with the beat or to create buildups/variations etc.
Microphone/Voice
I have a Rode Procaster mic with a Rode microphone boom, shock cage and pop shield, which is attached to my audio interface for my broadcasting PC with a long cable. I have it wired so that when I press a piano sustain pedal on the floor under my microphone, vocal ducking happens – e.g. the music fades down slightly and the microphone volume fades up so you can hear me talking over the music. In order to accomplish that I use two commercial apps, the first called ‘Auto-Duck in Real Time’ which allows me to configure the vocal ducking linked to a keyboard keypress, and ‘Bome’s MIDI Translator Classic’ which when the MIDI signal that is generated when I press the sustain pedal connected to my Novation Zero SL controller, the MIDI translator converts it into a keypress that is picked up by the ‘Auto-Duck in Real Time’ app to trigger vocal ducking. I have it configured so while I am holding down the sustain pedal, it ducks the music playing and when I release it, the music goes back to normal.
Internet Connection
I have a fast Virgin Media internet connection with 30mbits/second upload. I think my Twitch stream and everything else in my home requires about 5mbits/sec upload! I also have a backup internet fibre DSL connection that thankfully I have never had to use when I’m streaming, but it also has around 15mbits/second upload and I should be able to switch between both relatively quickly if I needed to.
Phew! That’s all! 🙂 I realise it is technically involved compared to a lot of peoples setups, but I have always been really interested in the technical side and have been lucky enough to be able to create exactly the setup that I really wanted for my stream. If you’re interested in checking it out, my regular stream is from 4PM UK time/UTC every Sunday and I play for at least 4 hours. Follow me on Twitch at: http://twitch.tv/djdavidcraddock
Struggling with the technical side? If you are interested in hiring me to help develop your own streaming setup, I have worked before in this capacity and can supply excellent references. The work can be done online, as with your permission I can remote control your computer and configure things. Please send me a message if you are interested via the contact form on this website.
Journalism has deteriorated to a huge degree in the online age. A lot of articles and video content are one-sided short ‘clickbait’ – short messages designed to trigger an extreme emotional reaction. ALMOST ALL journalism is like this these days, it doesn’t matter if you have a highly established news network you have been trusting for decades, they have all had to adopt this low-quality strategy due to the ultra-competitive and dire financial situation that all news reporting finds itself in. However a lot of people still take news content at complete face value, and this leads to a huge number of people being misled about the real facts.
So, whenever you are reading, listening to, or watching a piece of news content, here are some questions you can ask yourself to really get the full picture of what you are consuming.
1) How long is this news article/segment? What depth does it go into? Broadsheets like the New York Times go into much more depth than a 10 second ‘news highlights’ clip, and will usually present a much more detailed and extensive argument. If you really want to understand something, as the saying goes, read a book – or better yet, several books from several different perspectives. Do not expect to understand the full issue from TV news segments.
2) What emotional reaction is the journalist trying to get me to feel? What language does the piece use, what quotes are they using, what video are they using, what music do they use to set the scene, is the news anchor looking like they are being particularly dramatic? What is the emotional message?
3) What is the editorial slant of the news source? EVERY news source has an editorial voice – or bias – and you need to take that into account when getting your news from that source. It doesn’t matter if you generally agree with the editorial voice, you have to understand that everything is biased. News isn’t free and a lot of news sources get their funding from various ‘benefactors’ who often have a very real say on their editorial bias. Knowing how the news organisation is funded is very important in knowing what slant they will take, especially when it relates to political news.
4) Does the news piece provide a fair and plausible representation of both sides? There are ALWAYS two sides to the story, this is something that has been all but extinguished in modern news reporting. A few news sources will set up often comic ‘straw men’ opposition points, like the BBC interviewing odd people who drink their own urine for a news piece on how health information is understood by the public. While this may be amusing, it is not meant to present a fair and accurate argument from both sides, it is designed to ridicule one side. There are usually some genuine points from each side that are worth everyone considering, no matter what story it is.
5) Seek out contrary points and opposition points of view. If you want to understand a news event further, seek out a number of different articles from respectable sources with very different editorial voices/biases. Even when you take into account their individual biases, there are usually some valid points underneath it all.
I hope that everyone will consider thinking more criticially about the news they consume.

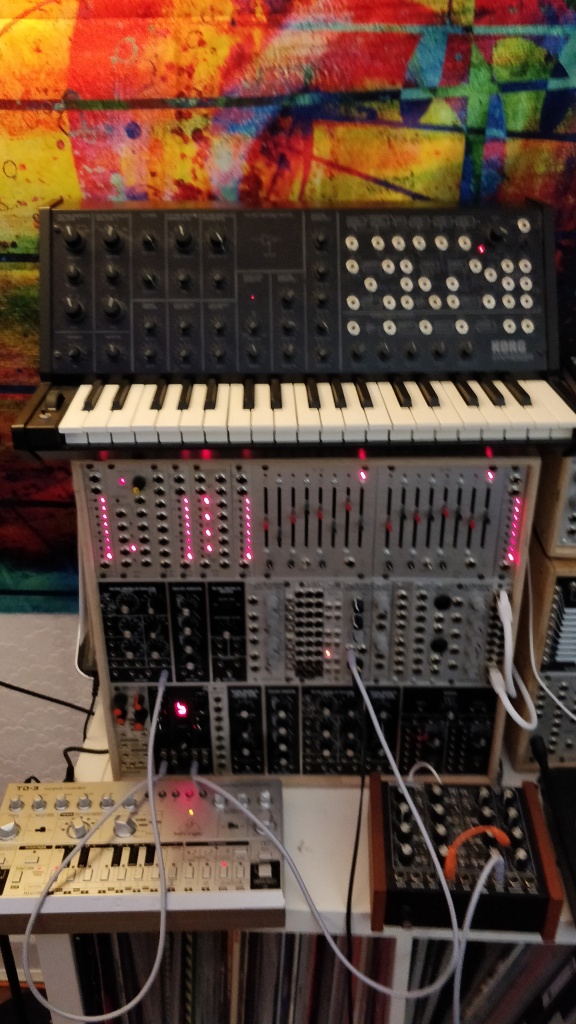

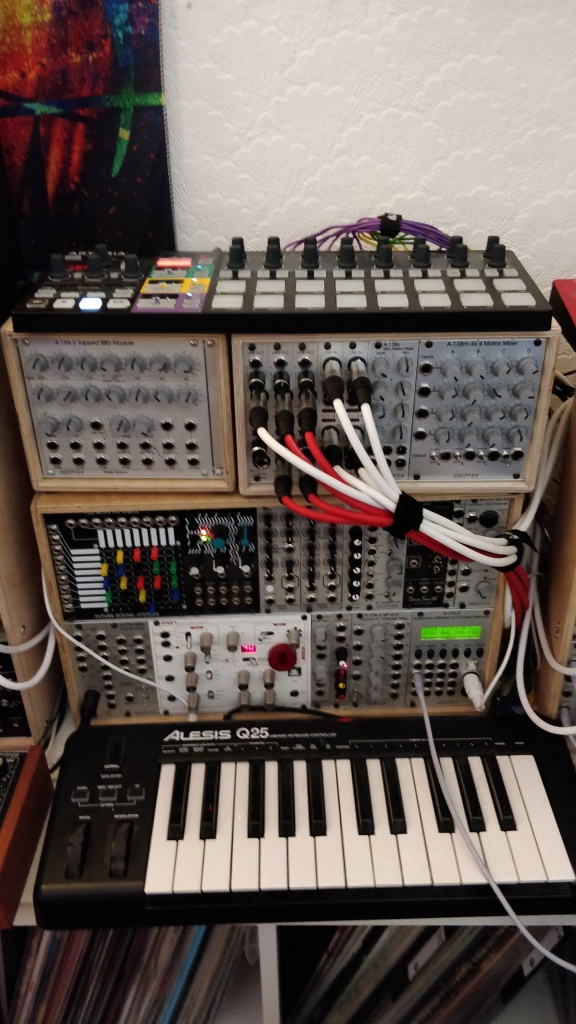
So.. finally my 27U Eurorack modular synthesiser is complete. I have filled up the third – and surely last, as there is no more room in the studio! – case. I started this Eurorack modular in 2015.. so I am glad it is all complete now. I put in a small amount nearly every month for new modules. I am not some ‘rich kid’ who could afford to buy everything at once – and indeed I think my gradual approach has benefitted the overall modular because it’s made me think about what I actually need, and given me time to learn as I go along.
These are the details for the (newest) left section case:
https://www.modulargrid.net/e/racks/view/1225766
These are the details for the middle and right sections:
https://www.modulargrid.net/e/racks/view/744839
Very happy!
In our house, seperate to my main PC (see the tab above) we still have two Ivy Bridge-based PCs:
Conny’s PC
My wife uses this as her main PC, and plays quite a few games with it. For a CPU and motherboard that I put together in 2011 or so, I am quite amazed it still runs adequetely! It runs the games she wants to play, the most graphically intensive being Deadpool, but it will also cope with Borderlands 2, Skyrim Special Edition, Shadow Warrior 2, and others. She is not interested in the top graphics games, but it runs just fine.
My Second PC
I have a computer that I use for my own programming and tech hobby projects. It used to be a top of the range workstation 2011 and I got it in a hardware disposal sale at Arm Ltd for only £400 in 2019. This is quite the deal, as it included a lisence for Windows 10 (normally costs £100 on its own).
I don’t need a powerful graphics card as I don’t game on it, and the Radeon R9 3200 supports my 2560x1440px monitor so it is more than adequete. I have installed VMWare on it and am looking to spin up some virtual machines as servers, and have them running in the background while I am browsing. I could assign several cores and quite a lot of the RAM and not really notice a difference with the light work I do when using the computer.
I am just amazed at how much you can do with these old high-end CPUS. The performance delta between these Ivy Bridge 2011 CPUs today’s processors really isn’t that large, and they are so cheap these days. This following video shows just how cheap you can build one of these setups, and how powerful they are even today:
The only situation where these processors don’t really work hugely well is in applications which emphasise single-core performance – I tried to use my second PC as an Ableton Live machine, and a lot of audio plugins I wanted to use were not optimised for multi-core processors, just single-core, so that didn’t work well.
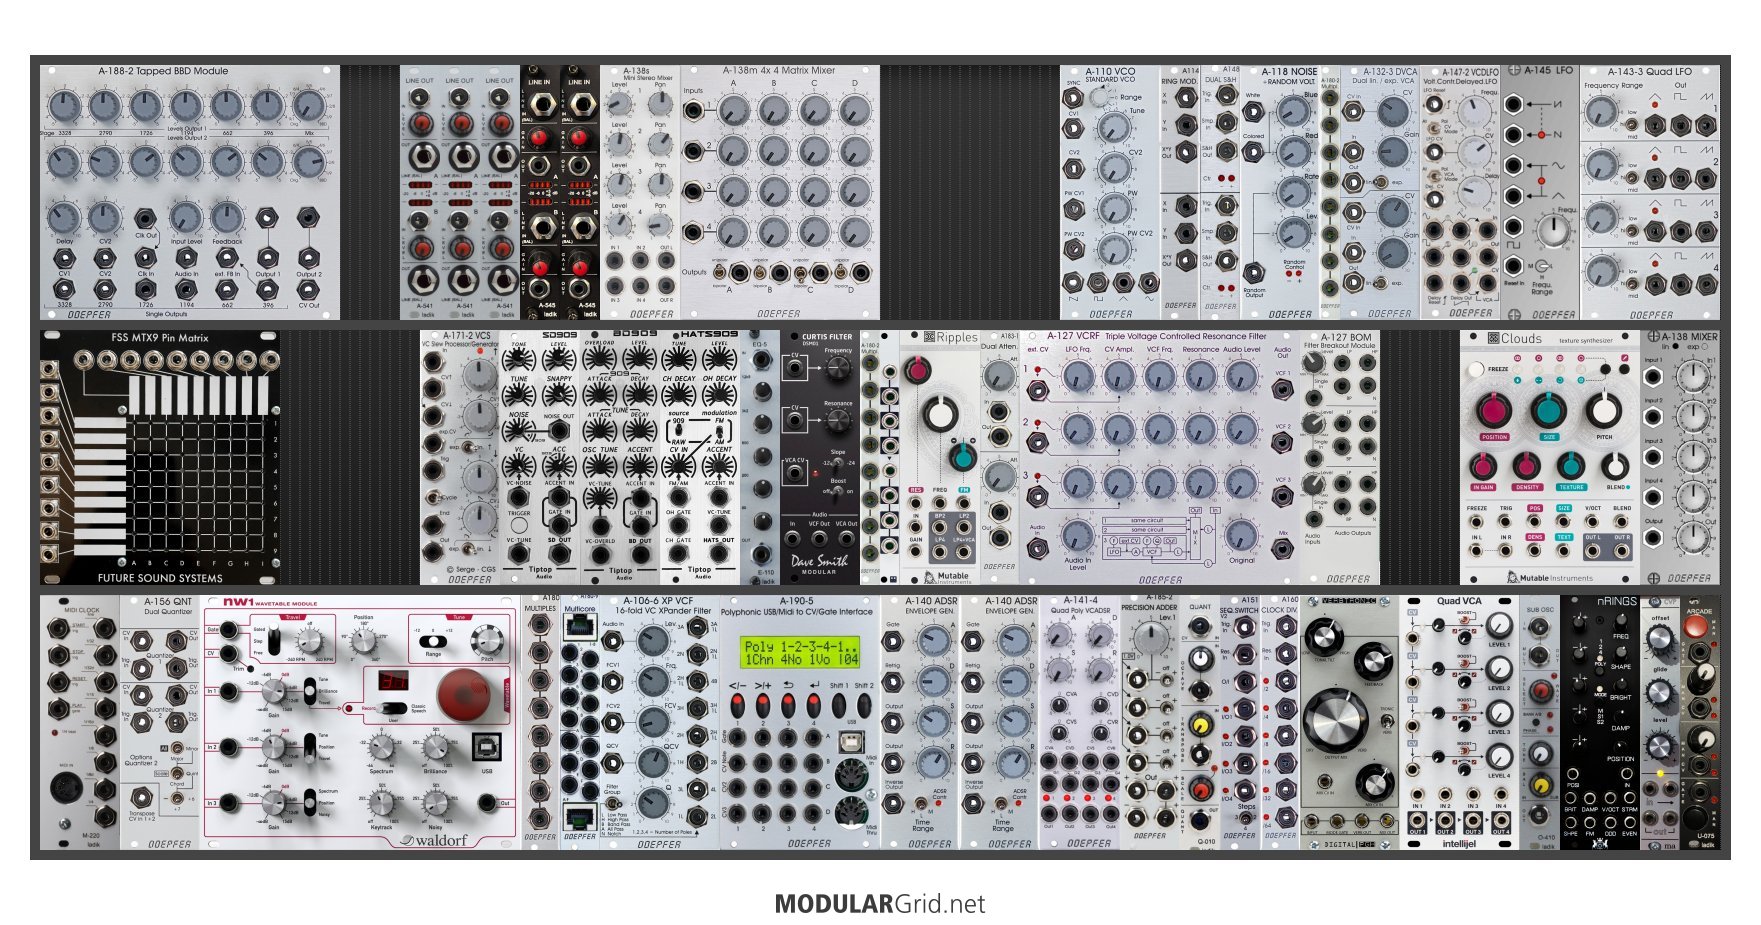

I have made some considerable modifications to my modular since my last post. I have a 4-voice polyphony setup now with multiple voice Osc, VCA, Envelope and MIDI-CV modules, allowing me to experiment with polyphony voicing.
Elsewhere, I have added an Access Virus C synthesizer to my studio, and now have rack-mounted Behringer Model D and Emu Orbit 9090 synthesizers. I have also upgraded to Ableton 10 and use NI’s Komplete suite including Massive X, plus TAL-NO-UX Juno 106 softsynth, Sylenth1 and others.
I thought I’d update my blog to reflect recent changes in my life, and review what was good and bad about them, as I was doing before.
The “Not Awesome”
The “Awesome”
